Table of Contents
- Preface
- 1. Security
- 1.1. Before You Begin
- 1.2. Introduction
- 1.3. High Level Design
- 1.4. Request Contexts
- 1.5. Security Interception
- 1.6. Authentication
- 1.6.1. Authentication Requests
- 1.6.2. Authentication Manager
- 1.6.3. Provider-Based Authentication
- 1.6.4. Concurrent Session Support
- 1.6.5. Data Access Object Authentication Provider
- 1.6.6. In-Memory Authentication
- 1.6.7. JDBC Authentication
- 1.6.8. JAAS Authentication
- 1.6.9. Siteminder Authentication
- 1.6.10. Authentication Recommendations
- 1.7. Authorization
- 1.8. After Invocation Handling
- 1.9. Run-As Authentication Replacement
- 1.10. User Interfacing with the SecurityContextHolder
- 1.11. Container Adapters
- 1.12. Yale Central Authentication Service (CAS) Single Sign On
- 1.13. X509 Authentication
- 1.14. Channel Security
- 1.15. Instance-Based Access Control List (ACL) Security
- 1.16. Filters
- 1.17. Contacts Sample Application
- 1.18. Become Involved
- 1.19. Further Information
This document provides a reference guide to the Acegi Security System for Spring, which is a series of classes that deliver authentication and authorization services within the Spring Framework.
I would like to acknowledge this reference was prepared using the DocBook configuration included with the Spring Framework. The Spring team in turn acknowledge Chris Bauer (Hibernate) for his assistance with their DocBook.
For your security, each official release JAR of Acegi Security has
been signed by the project leader. This does not in any way alter the
liability disclaimer contained in the License, but it does ensure you
are using a properly reviewed, official build of Acegi Security. Please
refer to the readme.txt file in the root of the
release distribution for instructions on how to validate the JARs are
correctly signed, and which certificate has been used to sign
them.
The Acegi Security System for Spring provides authentication and authorization capabilities for Spring-powered projects, with optional integration with popular web containers. The security architecture was designed from the ground up using "The Spring Way" of development, which includes using bean contexts, interceptors and interface-driven programming. As a consequence, the Acegi Security System for Spring is useful out-of-the-box for those seeking to secure their Spring-based applications, and can be easily adapted to complex customized requirements.
Security involves two distinct operations, authentication and authorization. The former relates to resolving whether or not a caller is who they claim to be. Authorization on the other hand relates to determining whether or not an authenticated caller is permitted to perform a given operation.
Throughout the Acegi Security System for Spring, the user, system or agent that needs to be authenticated is referred to as a "principal". The security architecture does not have a notion of roles or groups, which you may be familiar with from other security implementations, although equivalent functionality is fully accommodated by Acegi Security.
The Acegi Security System for Spring is widely used by members
of the Spring Community. The APIs are considered stable and only minor
changes are expected. Having said that, like many other projects we
need to strike a balance between backward compatibility and
improvement. Effective version 0.6.1, Acegi Security uses the Apache
Portable Runtime Project versioning guidelines, available from
http://apr.apache.org/versioning.html.
We are now at release 0.9.0, and a lot of effort has been made to implement all non-backward compatible changes either in or before this release. Some minor improvements are currently intended to the 1.0.0 release, although they will in no way modify the project's central interfaces or classes. Users of Acegi Security System for Spring should therefore be comfortable depending on the current version of the project in their applications. Please note that we will be changing the package name prefix in the 1.0.0 release, but this should be a simple "find and replace" type operation in your code.
Most enterprise applications have four basic security requirements. First, they need to be able to authenticate a principal. Second, they need to be able to secure web requests. Third, enterprise applications need to be able to secure services layer methods. Finally, quite often an enterprise application will need to secure domain object instances. Acegi Security provides a comprehensive framework for achieving all of these four common enterprise application security requirements.
The Acegi Security System for Spring essentially comprises eight key functional parts:
An
Authenticationobject which holds the principal, credentials and the authorities granted to the principal. The object can also store additional information associated with an authentication request, such as the source TCP/IP address.A
SecurityContextHolderwhich holds theAuthenticationobject in aThreadLocal-bound object.An
AuthenticationManagerto authenticate theAuthenticationobject presented via theContextHolder.An
AccessDecisionManagerto authorize a given operation.A
RunAsManagerto optionally replace theAuthenticationobject whilst a given operation is being executed.A "secure object" interceptor, which coordinates the authentication, authorization, run-as replacement, after invocation handling and execution of a given operation.
An
AfterInvocationManagerwhich can modify anObjectreturned from a "secure object" invocation, such as removingCollectionelements a principal does not have authority to access.An acess control list (ACL) management package, which can be used to obtain the ACLs applicable for domain object instances.
A "secure object" interceptor executes most of the Acegi
Security key classes and in doing so delivers the framework's major
features. Given its importance, Figure 1 shows the key relationships
and concrete implementations of
AbstractSecurityInterceptor.

Figure 1: The key "secure object" model
Each "secure object" interceptor (hereinafter called a "security interceptor") works with a particular type of "secure object". So, what is a secure object? Secure objects refer to any type of object that can have security applied to it. A secure object must provide some form of callback, so that the security interceptor can transparently do its work as required, and callback the object when it is time for it to proceed with the requested operation. If secure objects cannot provide a native callback approach, a wrapper needs to be written so this becomes possible.
Each secure object has its own package under
org.acegisecurity.intercept. Every other package in
the security system is secure object independent, in that it can
support any type of secure object presented.
Only developers contemplating an entirely new way of
intercepting and authorizing requests would need to use secure objects
directly. For example, it would be possible to build a new secure
object to secure calls to a messaging system that does not use
MethodInvocations. Most Spring applications will
simply use the three currently supported secure object types (AOP
Alliance MethodInvocation, AspectJ
JoinPoint and web request
FilterInterceptor) with complete
transparency.
Each of the eight key parts of Acegi Security are discussed in detail throughout this document.
As shown in the base of Figure 1, the Acegi Security System for Spring currently supports three secure objects.
The first handles an AOP Alliance
MethodInvocation. This is the secure object type
used to protect Spring beans. Developers will generally use this
secure object type to secure their business objects. To make a
standard Spring-hosted bean available as a
MethodInvocation, the bean is simply published
through a ProxyFactoryBean or
BeanNameAutoProxyCreator or
DefaultAdvisorAutoProxyCreator. Most Spring
developers would already be familiar with these due to their use in
transactions and other areas of Spring.
The second type is an AspectJ JoinPoint.
AspectJ has a particular use in securing domain object instances, as
these are most often managed outside the Spring bean container. By
using AspectJ, standard constructs such as new
Person(); can be used and full security will be applied to
them by Acegi Security. The
AspectJSecurityInterceptor is still managed by
Spring, which creates the aspect singleton and wires it with the
appropriate authentication managers, access decision managers and so
on.
The third type is a FilterInvocation. This is
an object included with the Acegi Security System for Spring. It is
created by an included filter and simply wraps the HTTP
ServletRequest, ServletResponse
and FilterChain. The
FilterInvocation enables HTTP resources to be
secured. Developers do not usually need to understand the mechanics of
how this works, because they just add the filters to their
web.xml and let the security system do its
work.
Every secure object can represent an infinite number of
individual requests. For example, a
MethodInvocation can represent the invocation of
any method with any arguments, whilst a
FilterInvocation can represent any HTTP URL.
The Acegi Security System for Spring needs to record the
configuration that applies to each of these possible requests. The
security configuration of a request to
BankManager.getBalance(int accountNumber) needs to
be very different from the security configuration of a request to
BankManager.approveLoan(int applicationNumber).
Similarly, the security configuration of a request to
http://some.bank.com/index.htm needs to be very
different from the security configuration of
http://some.bank.com/manage/timesheet.jsp.
To store the various security configurations associated with
different requests, a configuration attribute is used. At an
implementation level a configuration attribute is represented by the
ConfigAttribute interface. One concrete
implementation of ConfigAttribute is provided,
SecurityConfig, which simply stores a configuration
attribute as a String.
The collection of ConfigAttributes associated
with a particular request is held in a
ConfigAttributeDefinition. This concrete class is
simply a holder of ConfigAttributes and does
nothing special.
When a request is received by the security interceptor, it needs
to determine which configuration attributes apply. In other words, it
needs to find the ConfigAttributeDefinition which
applies to the request. This decision is handled by the
ObjectDefinitionSource interface. The main method
provided by this interface is public
ConfigAttributeDefinition getAttributes(Object object), with
the Object being the secure object. Recall the
secure object contains details of the request, so the
ObjectDefinitionSource implementation will be able
to extract the details it requires to lookup the relevant
ConfigAttributeDefinition.
Prior to release 0.9.0, Acegi Security used a
ContextHolder to store a Context
between sessions. A particular subclass of Context,
SecureContext defined an interface used for storage
of the Authentication object. The
ContextHolder was a ThreadLocal.
A fuller discussion of the ThreadLocal usage with
Acegi Security follows in this document.
ContextHolder and SecureContext
was removed from 0.9.0 after discussion with other Spring developers
for the sake of consistency. See for example
http://article.gmane.org/gmane.comp.java.springframework.devel/8290
and JIRA task SEC-77. This history is mentioned as the long period
ContextHolder was used will likely mean that
certain documentation you encounter concerning Acegi Security might
still refer to ContextHolder. Generally you can
just substitute "SecurityContextHolder" for
"ContextHolder", and
"SecurityContext" for
"SecureContext", and you'll have the primary
meaning of such documentation.
The Acegi Security System for Spring uses a
SecurityContextHolder to store the
SecurityContext. The
SecurityContext contains a single getter/setter for
Authentication. All Acegi Security classes query
the SecurityContextHolder for obtaining the current
SecurityContext (and in turn the principal).
SecurityContextHolder is a
ThreadLocal, meaning it is associated with the
current thread of execution.
Central to Acegi Security's design is that the contents of the
SecurityContextHolder (which is simply a
SecurityContext implementation) can be stored
between web requests. This is so that a successfully authenticated
principal can be identified on subsequent requests through the
Authentication stored inside the
SecurityContext obtained from the
SecurityContextHolder. The
HttpSessionContextIntegrationFilter exists to
automatically copy the contents of a well-defined
HttpSession attribute into the
SecurityContextHolder, then at the end of each
request, copy the SecurityContextHolder contents
back into the HttpSession ready for next
request.
It is essential - and an extremely common error of end users -
that HttpSessionContextIntegrationFilter appears
before any other Acegi Security filter. Acegi Security filters expect
to be able to modify the SecurityContextHolder
contents as they see fit, and something else (namely
HttpSessionContextIntegrationFilter) will store
those between requests if necessary. This is why
HttpSessionContextIntegrationFilter must be the
first filter used.
You can define a custom SecurityContext
implementation be used in your application by setting the
context property on the
HttpSessionContextIntegrationFilter bean.
From 1.0.0, Acegi Security supports localization of exception messages that end users are likely to see. Such exceptions include authentication failures and access being denied (authorization failures). Exceptions and logging that is focused on developers or system deployers (including incorrect attributes, interface contract violations, using incorrect constructors, startup time validation, debug-level logging) etc are not localized and instead are hard-coded in English within Acegi Security's code.
Shipping in the acegi-security-xx.jar inside
the org.acegisecurity package is a
messages.properties file. This should be referred
to by your ApplicationContext, as Acegi Security
classes implement Spring's MessageSourceAware
interface and expect the message resolver to be dependency injected at
application context startup time. Usually all you need to do is
register a bean inside your application context to refer to the
messages. An example is shown below:
<bean id="messageSource" class="org.springframework.context.support.ReloadableResourceBundleMessageSource">
  <property name="basename"><value>org/acegisecurity/messages</value></property>
</bean>
The messages.properties is named in
accordance with standard resource bundles and represents the default
language supported by Acegi Securtiy messages. This default file is in
English. If you do not register a message source, Acegi Security will
still work correctly and fallback to hard-coded English versions of
the messages.
If you wish to customize the
messages.properties file, or support other
languages, you should copy the file, rename it accordingly, and
register it inside the above bean definition. There are not a large
number of message keys inside this file, so localization should not be
considered a major initiative. If you do perform localization of this
file, please consider sharing your work with the community by logging
a JIRA task and attaching your appropriately-named localized version
of messages.properties.
Rounding out the discussion on localization is the Spring
ThreadLocal known as
org.springframework.context.i18n.LocaleContextHolder.
You should set the LocaleContextHolder to represent
the preferred Locale of each user. Acegi Security
will attempt to locate a message from the message source using the
Locale obtained from this
ThreadLocal. Please refer to Spring documentation
for further details on using LocaleContextHolder
and the helper classes that can automatically set it for you (eg
AcceptHeaderLocaleResolver,
CookieLocaleResolver,
FixedLocaleResolver,
SessionLocaleResolver etc)
As described in the High Level Design section, each secure object has its own security interceptor which is responsible for handling each request. Handling involves a number of operations:
Store the configuration attributes that are associated with each secure request.
Extract the
ConfigAttributeDefinitionthat applies to the request from the relevantObjectDefinitionSource.Obtain the
Authenticationobject from theSecurityContext, which is held in theSecurityContextHolder.Pass the
Authenticationobject to theAuthenticationManager, update theSecurityContextHolderwith the response.Pass the
Authenticationobject, theConfigAttributeDefinition, and the secure object to theAccessDecisionManager.Pass the
Authenticationobject, theConfigAttributeDefinition, and the secure object to theRunAsManager.If the
RunAsManagerreturns a newAuthenticationobject, update theSecurityContextHolderwith it.Proceed with the request execution of the secure object.
If the
RunAsManagerearlier returned a newAuthenticationobject, update theSecurityContextHolderwith theAuthenticationobject that was previously returned by theAuthenticationManager.If an
AfterInvocationManageris defined, pass it the result of the secure object execution so that it may throw anAccessDeniedExceptionor mutate the returned object if required.Return any result received from the
AfterInvocationManager, or if noAfterInvocationManageris defined, simply return the result provided by the secure object execution.
Whilst this may seem quite involved, don't worry. Developers
interact with the security process by simply implementing basic
interfaces (such as AccessDecisionManager), which
are fully discussed below.
The AbstractSecurityInterceptor handles the
majority of the flow listed above. As shown in Figure 1, each secure
object has its own security interceptor which subclasses
AbstractSecurityInterceptor. Each of these secure
object-specific security interceptors are discussed below.
To secure MethodInvocations, developers
simply add a properly configured
MethodSecurityInterceptor into the application
context. Next the beans requiring security are chained into the
interceptor. This chaining is accomplished using Spring’s
ProxyFactoryBean or
BeanNameAutoProxyCreator, as commonly used by many
other parts of Spring (refer to the sample application for examples).
Alternatively, Acegi Security provides a
MethodDefinitionSourceAdvisor which may be used
with Spring's DefaultAdvisorAutoProxyCreator to
automatically chain the security interceptor in front of any beans
defined against the MethodSecurityInterceptor. The
MethodSecurityInterceptor itself is configured as
follows:
<bean id="bankManagerSecurity" class="org.acegisecurity.intercept.method.aopalliance.MethodSecurityInterceptor">
  <property name="validateConfigAttributes"><value>true</value></property>
  <property name="authenticationManager"><ref bean="authenticationManager"/></property>
  <property name="accessDecisionManager"><ref bean="accessDecisionManager"/></property>
  <property name="runAsManager"><ref bean="runAsManager"/></property>
  <property name="afterInvocationManager"><ref bean="afterInvocationManager"/></property>
  <property name="objectDefinitionSource">
    <value>
      org.acegisecurity.context.BankManager.delete*=ROLE_SUPERVISOR,RUN_AS_SERVER
      org.acegisecurity.context.BankManager.getBalance=ROLE_TELLER,ROLE_SUPERVISOR,BANKSECURITY_CUSTOMER,RUN_AS_SERVER
    </value>
  </property>
</bean>
As shown above, the MethodSecurityInterceptor
is configured with a reference to an
AuthenticationManager,
AccessDecisionManager and
RunAsManager, which are each discussed in separate
sections below. In this case we've also defined an
AfterInvocationManager, although this is entirely
optional. The MethodSecurityInterceptor is also
configured with configuration attributes that apply to different
method signatures. A full discussion of configuration attributes is
provided in the High Level Design section of this document.
The MethodSecurityInterceptor can be
configured with configuration attributes in three ways. The first is
via a property editor and the application context, which is shown
above. The second is via defining the configuration attributes in your
source code using Jakarta Commons Attributes or Java 5 Annotations.
The third is via writing your own
ObjectDefinitionSource, although this is beyond the
scope of this document. Irrespective of the approach used, the
ObjectDefinitionSource is responsible for returning
a ConfigAttributeDefinition object that contains
all of the configuration attributes associated with a single secure
method.
It should be noted that the
MethodSecurityInterceptor.setObjectDefinitionSource()
method actually expects an instance of
MethodDefinitionSource. This is a marker interface
which subclasses ObjectDefinitionSource. It simply
denotes the ObjectDefinitionSource understands
MethodInvocations. In the interests of simplicity
we'll continue to refer to the
MethodDefinitionSource as an
ObjectDefinitionSource, as the distinction is of
little relevance to most users of the
MethodSecurityInterceptor.
If using the application context property editor approach (as
shown above), commas are used to delimit the different configuration
attributes that apply to a given method pattern. Each configuration
attribute is assigned into its own SecurityConfig
object. The SecurityConfig object is discussed in
the High Level Design section.
If you are using the Jakarta Commons Attributes approach, your bean context will be configured differently:
<bean id="attributes" class="org.springframework.metadata.commons.CommonsAttributes"/>
<bean id="objectDefinitionSource" class="org.acegisecurity.intercept.method.MethodDefinitionAttributes">
  <property name="attributes"><ref local="attributes"/></property>
</bean>

<bean id="bankManagerSecurity" class="org.acegisecurity.intercept.method.aopalliance.MethodSecurityInterceptor">
  <property name="validateConfigAttributes"><value>false</value></property>
  <property name="authenticationManager"><ref bean="authenticationManager"/></property>
  <property name="accessDecisionManager"><ref bean="accessDecisionManager"/></property>
  <property name="runAsManager"><ref bean="runAsManager"/></property>
  <property name="objectDefinitionSource"><ref bean="objectDefinitionSource"/></property>
</bean>
In addition, your source code will contain Jakarta Commons
Attributes tags that refer to a concrete implementation of
ConfigAttribute. The following example uses the
SecurityConfig implementation to represent the
configuration attributes, and results in the same security
configuration as provided by the property editor approach
above:
public interface BankManager {

    /**
     * @@SecurityConfig("ROLE_SUPERVISOR")
     * @@SecurityConfig("RUN_AS_SERVER")
     */
    public void deleteSomething(int id);

    /**
     * @@SecurityConfig("ROLE_SUPERVISOR")
     * @@SecurityConfig("RUN_AS_SERVER")
     */
    public void deleteAnother(int id);

    /**
     * @@SecurityConfig("ROLE_TELLER")
     * @@SecurityConfig("ROLE_SUPERVISOR")
     * @@SecurityConfig("BANKSECURITY_CUSTOMER")
     * @@SecurityConfig("RUN_AS_SERVER")
     */
    public float getBalance(int id);
}
If you are using the Spring Security Java 5 Annotations approach, your bean context will be configured as follows:
<bean id="attributes" class="org.acegisecurity.annotation.SecurityAnnotationAttributes"/>
<bean id="objectDefinitionSource" class="org.acegisecurity.intercept.method.MethodDefinitionAttributes">
  <property name="attributes"><ref local="attributes"/></property>
</bean>

<bean id="bankManagerSecurity" class="org.acegisecurity.intercept.method.aopalliance.MethodSecurityInterceptor">
  <property name="validateConfigAttributes"><value>false</value></property>
  <property name="authenticationManager"><ref bean="authenticationManager"/></property>
  <property name="accessDecisionManager"><ref bean="accessDecisionManager"/></property>
  <property name="runAsManager"><ref bean="runAsManager"/></property>
  <property name="objectDefinitionSource"><ref bean="objectDefinitionSource"/></property>
</bean>
In addition, your source code will contain the Acegi Java 5
Security Annotations that represent the
ConfigAttribute. The following example uses the
@Secured annotations to represent the configuration
attributes, and results in the same security configuration as provided
by the property editor approach:
import org.acegisecurity.annotation.Secured;

public interface BankManager {

    /**
     * Delete something
     */
    @Secured({"ROLE_SUPERVISOR","RUN_AS_SERVER" })
    public void deleteSomething(int id);

    /**
     * Delete another
     */
    @Secured({"ROLE_SUPERVISOR","RUN_AS_SERVER" })
    public void deleteAnother(int id);

    /**
     * Get balance
     */
    @Secured({"ROLE_TELLER","ROLE_SUPERVISOR","BANKSECURITY_CUSTOMER","RUN_AS_SERVER" })
    public float getBalance(int id);
}
You might have noticed the
validateConfigAttributes property in the above
MethodSecurityInterceptor examples. When set to
true (the default), at startup time the
MethodSecurityInterceptor will evaluate if the
provided configuration attributes are valid. It does this by checking
each configuration attribute can be processed by either the
AccessDecisionManager or the
RunAsManager. If neither of these can process a
given configuration attribute, an exception is thrown. If using the
Jakarta Commons Attributes method of configuration, you should set
validateConfigAttributes to
false.
The AspectJ security interceptor is very similar to the AOP Alliance security interceptor discussed in the previous section. Indeed we will only discuss the differences in this section.
The AspectJ interceptor is named
AspectJSecurityInterceptor. Unlike the AOP Alliance
security interceptor, which relies on the Spring application context
to weave in the security interceptor via proxying, the
AspectJSecurityInterceptor is weaved in via the
AspectJ compiler. It would not be uncommon to use both types of
security interceptors in the same application, with
AspectJSecurityInterceptor being used for domain
object instance security and the AOP Alliance
MethodSecurityInterceptor being used for services
layer security.
Let's first consider how the
AspectJSecurityInterceptor is configured in the
Spring application context:
<bean id="bankManagerSecurity" class="org.acegisecurity.intercept.method.aspectj.AspectJSecurityInterceptor">
  <property name="validateConfigAttributes"><value>true</value></property>
  <property name="authenticationManager"><ref bean="authenticationManager"/></property>
  <property name="accessDecisionManager"><ref bean="accessDecisionManager"/></property>
  <property name="runAsManager"><ref bean="runAsManager"/></property>
  <property name="afterInvocationManager"><ref bean="afterInvocationManager"/></property>
  <property name="objectDefinitionSource">
    <value>
      org.acegisecurity.context.BankManager.delete*=ROLE_SUPERVISOR,RUN_AS_SERVER
      org.acegisecurity.context.BankManager.getBalance=ROLE_TELLER,ROLE_SUPERVISOR,BANKSECURITY_CUSTOMER,RUN_AS_SERVER
    </value>
  </property>
</bean>
As you can see, aside from the class name, the
AspectJSecurityInterceptor is exactly the same as
the AOP Alliance security interceptor. Indeed the two interceptors can
share the same objectDefinitionSource, as the
ObjectDefinitionSource works with
java.lang.reflect.Methods rather than an AOP
library-specific class. Of course, your access decisions have access
to the relevant AOP library-specific invocation (ie
MethodInvocation or JoinPoint)
and as such can consider a range of addition criteria when making
access decisions (such as method arguments).
Next you'll need to define an AspectJ aspect.
For example:
package org.acegisecurity.samples.aspectj;

import org.acegisecurity.intercept.method.aspectj.AspectJSecurityInterceptor;
import org.acegisecurity.intercept.method.aspectj.AspectJCallback;
import org.springframework.beans.factory.InitializingBean;

public aspect DomainObjectInstanceSecurityAspect implements InitializingBean {

  private AspectJSecurityInterceptor securityInterceptor;

  pointcut domainObjectInstanceExecution(): target(PersistableEntity)
             && execution(public * *(..)) && !within(DomainObjectInstanceSecurityAspect);

  Object around(): domainObjectInstanceExecution() {
    if (this.securityInterceptor != null) {
      AspectJCallback callback = new AspectJCallback() {
        public Object proceedWithObject() {
        return proceed();
      }
    };
    return this.securityInterceptor.invoke(thisJoinPoint, callback);
    } else {
      return proceed();
    }
  }

  public AspectJSecurityInterceptor getSecurityInterceptor() {
    return securityInterceptor;
  }

  public void setSecurityInterceptor(AspectJSecurityInterceptor securityInterceptor) {
    this.securityInterceptor = securityInterceptor;
  }

  public void afterPropertiesSet() throws Exception {
    if (this.securityInterceptor == null)
      throw new IllegalArgumentException("securityInterceptor required");
  }
}
In the above example, the security interceptor will be applied
to every instance of PersistableEntity, which is an
abstract class not shown (you can use any other class or
pointcut expression you like). For those curious,
AspectJCallback is needed because the
proceed(); statement has special meaning only
within an around() body. The
AspectJSecurityInterceptor calls this anonymous
AspectJCallback class when it wants the target
object to continue.
You will need to configure Spring to load the aspect and wire it
with the AspectJSecurityInterceptor. A bean
declaration which achieves this is shown below:
<bean id="domainObjectInstanceSecurityAspect"
    class="org.acegisecurity.samples.aspectj.DomainObjectInstanceSecurityAspect"
    factory-method="aspectOf">
  <property name="securityInterceptor"><ref bean="aspectJSecurityInterceptor"/></property>
</bean>
That's it! Now you can create your beans from anywhere within
your application, using whatever means you think fit (eg new
Person();) and they will have the security interceptor
applied.
To secure FilterInvocations, developers need
to add a filter to their web.xml that delegates to
the SecurityEnforcementFilter. A typical
configuration example is provided below:
<filter>
  <filter-name>Acegi HTTP Request Security Filter</filter-name>
  <filter-class>org.acegisecurity.util.FilterToBeanProxy</filter-class>
  <init-param>
    <param-name>targetClass</param-name>
    <param-value>org.acegisecurity.intercept.web.SecurityEnforcementFilter</param-value>
  </init-param>
</filter>

<filter-mapping>
  <filter-name>Acegi HTTP Request Security Filter</filter-name>
  <url-pattern>/*</url-pattern>
</filter-mapping>
Notice that the filter is actually a
FilterToBeanProxy. Most of the filters used by the
Acegi Security System for Spring use this class. Refer to the Filters
section to learn more about this bean.
In the application context you will need to configure three beans:
<bean id="securityEnforcementFilter" class="org.acegisecurity.intercept.web.SecurityEnforcementFilter">
  <property name="filterSecurityInterceptor"><ref bean="filterInvocationInterceptor"/></property>
  <property name="authenticationEntryPoint"><ref bean="authenticationEntryPoint"/></property>
</bean>

<bean id="authenticationEntryPoint" class="org.acegisecurity.ui.webapp.AuthenticationProcessingFilterEntryPoint">
  <property name="loginFormUrl"><value>/acegilogin.jsp</value></property>
  <property name="forceHttps"><value>false</value></property>
</bean>

<bean id="filterInvocationInterceptor" class="org.acegisecurity.intercept.web.FilterSecurityInterceptor">
  <property name="authenticationManager"><ref bean="authenticationManager"/></property>
  <property name="accessDecisionManager"><ref bean="accessDecisionManager"/></property>
  <property name="runAsManager"><ref bean="runAsManager"/></property>
  <property name="objectDefinitionSource">
    <value>
      CONVERT_URL_TO_LOWERCASE_BEFORE_COMPARISON
      \A/secure/super/.*\Z=ROLE_WE_DONT_HAVE
      \A/secure/.*\Z=ROLE_SUPERVISOR,ROLE_TELLER
    </value>
  </property>
</bean>
The AuthenticationEntryPoint will be called
if the user requests a secure HTTP resource but they are not
authenticated. The class handles presenting the appropriate response
to the user so that authentication can begin. Three concrete
implementations are provided with the Acegi Security System for
Spring: AuthenticationProcessingFilterEntryPoint
for commencing a form-based authentication,
BasicProcessingFilterEntryPoint for commencing a
HTTP Basic authentication process, and
CasProcessingFilterEntryPoint for commencing a Yale
Central Authentication Service (CAS) login. The
AuthenticationProcessingFilterEntryPoint and
CasProcessingFilterEntryPoint have optional
properties related to forcing the use of HTTPS, so please refer to the
JavaDocs if you require this.
The PortMapper provides information on which
HTTPS ports correspond to which HTTP ports. This is used by the
AuthenticationProcessingFilterEntryPoint and
several other beans. The default implementation,
PortMapperImpl, knows the common HTTP ports 80 and
8080 map to HTTPS ports 443 and 8443 respectively. You can customise
this mapping if desired.
The SecurityEnforcementFilter primarily
provides session management support and initiates authentication when
required. It delegates actual FilterInvocation
security decisions to the configured
FilterSecurityInterceptor.
Like any other security interceptor, the
FilterSecurityInterceptor requires a reference to
an AuthenticationManager,
AccessDecisionManager and
RunAsManager, which are each discussed in separate
sections below. The FilterSecurityInterceptor is
also configured with configuration attributes that apply to different
HTTP URL requests. A full discussion of configuration attributes is
provided in the High Level Design section of this document.
The FilterSecurityInterceptor can be
configured with configuration attributes in two ways. The first is via
a property editor and the application context, which is shown above.
The second is via writing your own
ObjectDefinitionSource, although this is beyond the
scope of this document. Irrespective of the approach used, the
ObjectDefinitionSource is responsible for returning
a ConfigAttributeDefinition object that contains
all of the configuration attributes associated with a single secure
HTTP URL.
It should be noted that the
FilterSecurityInterceptor.setObjectDefinitionSource()
method actually expects an instance of
FilterInvocationDefinitionSource. This is a marker
interface which subclasses ObjectDefinitionSource.
It simply denotes the ObjectDefinitionSource
understands FilterInvocations. In the interests of
simplicity we'll continue to refer to the
FilterInvocationDefinitionSource as an
ObjectDefinitionSource, as the distinction is of
little relevance to most users of the
FilterSecurityInterceptor.
If using the application context property editor approach (as
shown above), commas are used to delimit the different configuration
attributes that apply to each HTTP URL. Each configuration attribute
is assigned into its own SecurityConfig object. The
SecurityConfig object is discussed in the High
Level Design section. The ObjectDefinitionSource
created by the property editor,
FilterInvocationDefinitionSource, matches
configuration attributes against FilterInvocations
based on expression evaluation of the request URL. Two standard
expression syntaxes are supported. The default is to treat all
expressions as regular expressions. Alternatively, the presence of a
PATTERN_TYPE_APACHE_ANT directive will cause all
expressions to be treated as Apache Ant paths. It is not possible to
mix expression syntaxes within the same definition. For example, the
earlier configuration could be generated using Apache Ant paths as
follows:
<bean id="filterInvocationInterceptor" class="org.acegisecurity.intercept.web.FilterSecurityInterceptor">
  <property name="authenticationManager"><ref bean="authenticationManager"/></property>
  <property name="accessDecisionManager"><ref bean="accessDecisionManager"/></property>
  <property name="runAsManager"><ref bean="runAsManager"/></property>
  <property name="objectDefinitionSource">
    <value>
      CONVERT_URL_TO_LOWERCASE_BEFORE_COMPARISON
      PATTERN_TYPE_APACHE_ANT
      /secure/super/**=ROLE_WE_DONT_HAVE
      /secure/**=ROLE_SUPERVISOR,ROLE_TELLER
    </value>
  </property>
</bean>
Irrespective of the type of expression syntax used, expressions
are always evaluated in the order they are defined. Thus it is
important that more specific expressions are defined higher in the
list than less specific expressions. This is reflected in our example
above, where the more specific /secure/super/
pattern appears higher than the less specific
/secure/ pattern. If they were reversed, the
/secure/ pattern would always match and the
/secure/super/ pattern would never be
evaluated.
The special keyword
CONVERT_URL_TO_LOWERCASE_BEFORE_COMPARISON causes
the FilterInvocationDefinitionSource to
automatically convert a request URL to lowercase before comparison
against the expressions. Whilst by default the case of the request URL
is not converted, it is generally recommended to use
CONVERT_URL_TO_LOWERCASE_BEFORE_COMPARISON and
write each expression assuming lowercase.
As with other security interceptors, the
validateConfigAttributes property is observed. When
set to true (the default), at startup time the
FilterSecurityInterceptor will evaluate if the
provided configuration attributes are valid. It does this by checking
each configuration attribute can be processed by either the
AccessDecisionManager or the
RunAsManager. If neither of these can process a
given configuration attribute, an exception is thrown.
Authentication requires a way for client code to present its
security identification to the Acegi Security System for Spring. This
is the role of the Authentication interface. The
Authentication interface holds three important
objects: the principal (the identity of the caller), the credentials
(the proof of the identity of the caller, such as a password), and the
authorities that have been granted to the principal. The principal and
its credentials are populated by the client code, whilst the granted
authorities are populated by the
AuthenticationManager.

Figure 3: Key Authentication Architecture
As shown in Figure 3, the Acegi Security System for Spring
includes several concrete Authentication
implementations:
UsernamePasswordAuthenticationTokenallows a username and password to be presented as the principal and credentials respectively. It is also what is created by the HTTP Session Authentication system.TestingAuthenticationTokenfacilitates unit testing by automatically being considered an authenticated object by its associatedAuthenticationProvider.RunAsUserTokenis used by the default run-as authentication replacement implementation. This is discussed further in the Run-As Authentication Replacement section.CasAuthenticationTokenis used to represent a successful Yale Central Authentication Service (CAS) authentication. This is discussed further in the CAS section.PrincipalAcegiUserTokenandJettyAcegiUserTokenimplementAuthByAdapter(a subclass ofAuthentication) and are used whenever authentication is completed by Acegi Security System for Spring container adapters. This is discussed further in the Container Adapters section.
The authorities granted to a principal are represented by the
GrantedAuthority interface. The
GrantedAuthority interface is discussed at length
in the Authorization section.
As discussed in the Security Interception section, the
AbstractSecurityInterceptor extracts the
Authentication object from the
SecurityContext in the
SecurityContextHolder. This is then passed to an
AuthenticationManager. The
AuthenticationManager interface is very
simple:
public Authentication authenticate(Authentication authentication) throws AuthenticationException;
Implementations of AuthenticationManager are
required to throw an AuthenticationException should
authentication fail, or return a fully populated
Authentication object. In particular, the returned
Authentication object should contain an array of
GrantedAuthority objects. The
SecurityInterceptor places the populated
Authentication object back in the
SecurityContext in the
SecurityContextHolder, overwriting the original
Authentication object.
The AuthenticationException has a number of
subclasses. The most important are
BadCredentialsException (an incorrect principal or
credentials), DisabledException and
LockedException. The latter two exceptions indicate
the principal was found, but the credentials were not checked and
authentication is denied. An
AuthenticationServiceException is also provided,
which indicates the authentication system could not process the
request (eg a database was unavailable).
AuthenticationException also has a
CredentialsExpiredException and
AccoungtExpiredException subclass, although these
are less commonly used.
Whilst the basic Authentication and
AuthenticationManager interfaces enable users to
develop their own authentication systems, users should consider using
the provider-based authentication packages provided by the Acegi
Security System for Spring. The key class,
ProviderManager, is configured via the bean context
with a list of AuthenticationProviders:
<bean id="authenticationManager" class="org.acegisecurity.providers.ProviderManager">
  <property name="providers">
    <list>
      <ref bean="daoAuthenticationProvider"/>
      <ref bean="someOtherAuthenticationProvider"/>
    </list>
  </property>
</bean>
ProviderManager calls a series of registered
AuthenticationProvider implementations, until one
is found that indicates it is able to authenticate a given
Authentication class. When the first compatible
AuthenticationProvider is located, it is passed the
authentication request. The AuthenticationProvider
will then either throw an AuthenticationException
or return a fully populated Authentication
object.
Note the ProviderManager may throw a
ProviderNotFoundException (a subclass of
AuthenticationException) if it none of the
registered AuthenticationProviders can validate the
Authentication object.
The ProviderManager also has several other
important functions. It integrates with concurrent session handling
supoprt, and it also converts any exceptions thrown by an
AuthenticationProvider and publishes a suitable
event. The events that are published are located in the
org.acegisecurity.event.authentication package and
advanced users can map different exceptions to different events by
configuring the ProviderManager.exceptionMappings
property (generally this is not required and the default event
propagation is appropriate - especially as events will simply be
ignored if you don't have an ApplicationListener
configured in the ApplicationContext).
Several AuthenticationProvider
implementations are provided with the Acegi Security System for
Spring:
TestingAuthenticationProvideris able to authenticate aTestingAuthenticationToken. The limit of its authentication is simply to treat whatever is contained in theTestingAuthenticationTokenas valid. This makes it ideal for use during unit testing, as you can create anAuthenticationobject with precisely theGrantedAuthorityobjects required for calling a given method. You definitely would not register thisAuthenticationProvideron a production system.DaoAuthenticationProvideris able to authenticate aUsernamePasswordAuthenticationTokenby accessing an authentication respository via a data access object. This is discussed further below, as it is the main way authentication is initially handled.RunAsImplAuthenticationProvideris able to authenticate aRunAsUserToken. This is discussed further in the Run-As Authentication Replacement section. You would not register thisAuthenticationProviderif you were not using run-as replacement.AuthByAdapterProvideris able to authenticate anyAuthByAdapter(a subclass ofAuthenticationused with container adapters). This is discussed further in the Container Adapters section. You would not register thisAuthenticationProviderif you were not using container adapters.CasAuthenticationProvideris able to authenticate Yale Central Authentication Service (CAS) tickets. This is discussed further in the CAS Single Sign On section.JaasAuthenticationProvideris able to delegate authentication requests to a JAASLoginModule. This is discussed further below.
Acegi Security is able to stop the same principal authenticating to the same web application multiple times concurrently. Put differently, you can stop user "Batman" from logging into a web application twice at the same time.
To use concurrent session support, you'll need to add the following to web.xml:
<listener>
  <listener-class>org.acegisecurity.ui.session.HttpSessionEventPublisher</listener-class>
</listener>
In addition, you will need to add the
org.acegisecurity.concurrent.ConcurrentSessionFilter
to your FilterChainProxy. The
ConcurrentSessionFilter requires only one property, sessionRegistry,
which generally points to an instance of
SessionRegistryImpl.
The web.xml
HttpSessionEventPublisher causes an
ApplicationEvent to be published to the Spring
ApplicationContext every time a
HttpSession commences or terminates. This is
critical, as it allows the SessionRegistryImpl to
be notified when a session ends.
You will also need to wire up the
ConcurrentSessionControllerImpl and refer to it
from your ProviderManager bean:
<bean id="authenticationManager" class="org.acegisecurity.providers.ProviderManager">
  <property name="providers">
    <!-- your providers go here -->
  </property>
  <property name="sessionController"><ref bean="concurrentSessionController"/></property>
</bean>

<bean id="concurrentSessionController" class="org.acegisecurity.concurrent.ConcurrentSessionControllerImpl">
  <property name="maximumSessions"><value>1</value></property>
  <property name="sessionRegistry"><ref local="sessionRegistry"/></property>
</bean>

<bean id="sessionRegistry" class="org.acegisecurity.concurrent.SessionRegistryImpl"/>The Acegi Security System for Spring includes a
production-quality AuthenticationProvider
implementation called DaoAuthenticationProvider.
This authentication provider is able to authenticate a
UsernamePasswordAuthenticationToken by obtaining
authentication details from a data access object configured at bean
creation time:
<bean id="daoAuthenticationProvider" class="org.acegisecurity.providers.dao.DaoAuthenticationProvider">
  <property name="userDetailsService"><ref bean="inMemoryDaoImpl"/></property>
  <property name="saltSource"><ref bean="saltSource"/></property>
  <property name="passwordEncoder"><ref bean="passwordEncoder"/></property>
</bean>
The PasswordEncoder and
SaltSource are optional. A
PasswordEncoder provides encoding and decoding of
passwords obtained from the authentication repository. A
SaltSource enables the passwords to be populated
with a "salt", which enhances the security of the passwords in the
authentication repository. PasswordEncoder
implementations are provided with the Acegi Security System for Spring
covering MD5, SHA and cleartext encodings. Two
SaltSource implementations are also provided:
SystemWideSaltSource which encodes all passwords
with the same salt, and ReflectionSaltSource, which
inspects a given property of the returned
UserDetails object to obtain the salt. Please refer
to the JavaDocs for further details on these optional features.
In addition to the properties above, the
DaoAuthenticationProvider supports optional caching
of UserDetails objects. The
UserCache interface enables the
DaoAuthenticationProvider to place a
UserDetails object into the cache, and retrieve it
from the cache upon subsequent authentication attempts for the same
username. By default the DaoAuthenticationProvider
uses the NullUserCache, which performs no caching.
A usable caching implementation is also provided,
EhCacheBasedUserCache, which is configured as
follows:
<bean id="daoAuthenticationProvider" class="org.acegisecurity.providers.dao.DaoAuthenticationProvider">
  <property name="userDetailsService"><ref bean="userDetailsService"/></property>
  <property name="userCache"><ref bean="userCache"/></property>
</bean>

<bean id="cacheManager" class="org.springframework.cache.ehcache.EhCacheManagerFactoryBean">
  <property name="configLocation">
    <value>classpath:/ehcache-failsafe.xml</value>
  </property>
</bean>

<bean id="userCacheBackend" class="org.springframework.cache.ehcache.EhCacheFactoryBean">
  <property name="cacheManager">
    <ref local="cacheManager"/>
  </property>
  <property name="cacheName">
    <value>userCache</value>
  </property>
</bean>

<bean id="userCache" class="org.acegisecurity.providers.dao.cache.EhCacheBasedUserCache">
  <property name="cache"><ref local="userCacheBackend"/></property>
</bean>
All Acegi Security EH-CACHE implementations (including
EhCacheBasedUserCache) require an EH-CACHE
Cache object. The Cache object
can be obtained from wherever you like, although we recommend you use
Spring's factory classes as shown in the above configuration. If using
Spring's factory classes, please refer to the Spring documentation for
further details on how to optimise the cache storage location, memory
usage, eviction policies, timeouts etc.
For a class to be able to provide the
DaoAuthenticationProvider with access to an
authentication repository, it must implement the
UserDetailsService interface:
public UserDetails loadUserByUsername(String username) throws UsernameNotFoundException, DataAccessException;
The UserDetails is an interface that provides
getters that guarantee non-null provision of basic authentication
information such as the username, password, granted authorities and
whether the user is enabled or disabled. A concrete implementation,
User, is also provided. Acegi Security users will
need to decide when writing their
UserDetailsService what type of
UserDetails to return. In most cases
User will be used directly or subclassed, although
special circumstances (such as object relational mappers) may require
users to write their own UserDetails implementation
from scratch. UserDetails is often used to store
additional principal-related properties (such as their telephone
number and email address), so they can be easily used by web
views.
Given UserDetailsService is so simple to
implement, it should be easy for users to retrieve authentication
information using a persistence strategy of their choice.
A design decision was made not to support account locking in the
DaoAuthenticationProvider, as doing so would have
increased the complexity of the UserDetailsService
interface. For instance, a method would be required to increase the
count of unsuccessful authentication attempts. Such functionality
could be easily provided by leveraging the application event
publishing features discussed below.
DaoAuthenticationProvider returns an
Authentication object which in turn has its
principal property set. The principal will be
either a String (which is essentially the username)
or a UserDetails object (which was looked up from
the UserDetailsService). By default the
UserDetails is returned, as this enables
applications to add extra properties potentially of use in
applications, such as the user's full name, email address etc. If
using container adapters, or if your applications were written to
operate with Strings (as was the case for releases
prior to Acegi Security 0.6), you should set the
DaoAuthenticationProvider.forcePrincipalAsString
property to true in your application
context.
Whilst it is easy to use the
DaoAuthenticationProvider and create a custom
UserDetailsService implementation that extracts
information from a persistence engine of choice, many applications do
not require such complexity. One alternative is to configure an
authentication repository in the application context itself using the
InMemoryDaoImpl:
<bean id="inMemoryDaoImpl" class="org.acegisecurity.userdetails.memory.InMemoryDaoImpl">
  <property name="userMap">
    <value>
      marissa=koala,ROLE_TELLER,ROLE_SUPERVISOR
      dianne=emu,ROLE_TELLER
      scott=wombat,ROLE_TELLER
      peter=opal,disabled,ROLE_TELLER
    </value>
  </property>
</bean>
The userMap property contains each of the
usernames, passwords, a list of granted authorities and an optional
enabled/disabled keyword. Commas delimit each token. The username must
appear to the left of the equals sign, and the password must be the
first token to the right of the equals sign. The
enabled and disabled keywords
(case insensitive) may appear in the second or any subsequent token.
Any remaining tokens are treated as granted authorities, which are
created as GrantedAuthorityImpl objects (refer to
the Authorization section for further discussion on granted
authorities). Note that if a user has no password and/or no granted
authorities, the user will not be created in the in-memory
authentication repository.
InMemoryDaoImpl also offers a
setUserProperties(Properties) method, which allows
you to externalise the java.util.Properties in
another Spring configured bean or an external properties file. This
might prove useful for simple applications that have a larger number
of users, or deployment-time configuration changes, but do not wish to
use a full database for authentication details.
The Acegi Security System for Spring also includes an
authentication provider that can obtain authentication information
from a JDBC data source. The typical configuration for the
JdbcDaoImpl is shown below:
<bean id="dataSource" class="org.springframework.jdbc.datasource.DriverManagerDataSource">
  <property name="driverClassName"><value>org.hsqldb.jdbcDriver</value></property>
  <property name="url"><value>jdbc:hsqldb:hsql://localhost:9001</value></property>
  <property name="username"><value>sa</value></property>
  <property name="password"><value></value></property>
</bean>

<bean id="jdbcDaoImpl" class="org.acegisecurity.userdetails.jdbc.JdbcDaoImpl">
  <property name="dataSource"><ref bean="dataSource"/></property>
</bean>
You can use different relational database management systems by
modifying the DriverManagerDataSource shown above.
Irrespective of the database used, a standard schema must be used as
indicated in dbinit.txt.
If you default schema is unsuitable for your needs,
JdbcDaoImpl provides two properties that allow
customisation of the SQL statements. You may also subclass the
JdbcDaoImpl if further customisation is necessary.
Please refer to the JavaDocs for details.
Acegi Security provides a package able to delegate authentication requests to the Java Authentication and Authorization Service (JAAS). This package is discussed in detail below.
Central to JAAS operation are login configuration files. To learn more about JAAS login configuration files, consult the JAAS reference documentation available from Sun Microsystems. We expect you to have a basic understanding of JAAS and its login configuration file syntax in order to understand this section.
The JaasAuthenticationProvider attempts to
authenticate a user’s principal and credentials through JAAS.
Let’s assume we have a JAAS login configuration file,
/WEB-INF/login.conf, with the following
contents:
JAASTest {
  sample.SampleLoginModule required;
};
Like all Acegi Security beans, the
JaasAuthenticationProvider is configured via the
application context. The following definitions would correspond to
the above JAAS login configuration file:
<bean id="jaasAuthenticationProvider" class="org.acegisecurity.providers.jaas.JaasAuthenticationProvider">
  <property name="loginConfig">
    <value>/WEB-INF/login.conf</value>
  </property>
  <property name="loginContextName">
    <value>JAASTest</value>
  </property>
  <property name="callbackHandlers">
    <list>
      <bean class="org.acegisecurity.providers.jaas.JaasNameCallbackHandler"/>
      <bean class="org.acegisecurity.providers.jaas.JaasPasswordCallbackHandler"/>
    </list>
  </property>
  <property name="authorityGranters">
    <list>
      <bean class="org.acegisecurity.providers.jaas.TestAuthorityGranter"/>
    </list>
  </property>
</bean>
The CallbackHandlers and
AuthorityGranters are discussed below.
Most JAAS LoginModules require a callback
of some sort. These callbacks are usually used to obtain the
username and password from the user. In an Acegi Security
deployment, Acegi Security is responsible for this user interaction
(typically via a reference to a
ContextHolder-managed
Authentication object). The JAAS package for
Acegi Security provides two default callback handlers,
JaasNameCallbackHandler and
JaasPasswordCallbackHandler. Each of these
callback handlers implement
JaasAuthenticationCallbackHandler. In most cases
these callback handlers can simply be used without understanding the
internal mechanics. For those needing full control over the callback
behavior, internally JaasAutheticationProvider
wraps these JaasAuthenticationCallbackHandlers
with an InternalCallbackHandler. The
InternalCallbackHandler is the class that
actually implements JAAS’ normal CallbackHandler
interface. Any time that the JAAS LoginModule is
used, it is passed a list of application context configured
InternalCallbackHandlers. If the
LoginModule requests a callback against the
InternalCallbackHandlers, the callback is in-turn
passed to the JaasAuthenticationCallbackHandlers
being wrapped.
JAAS works with principals. Even “roles” are represented as
principals in JAAS. Acegi Security, on the other hand, works with
Authentication objects. Each
Authentication object contains a single
principal, and multiple GrantedAuthority[]s. To
facilitate mapping between these different concepts, the Acegi
Security JAAS package includes an
AuthorityGranter interface. An
AuthorityGranter is responsible for inspecting a
JAAS principal and returning a String. The
JaasAuthenticationProvider then creates a
JaasGrantedAuthority (which implements Acegi
Security’s GrantedAuthority interface) containing
both the AuthorityGranter-returned
String and the JAAS principal that the
AuthorityGranter was passed. The
JaasAuthenticationProvider obtains the JAAS
principals by firstly successfully authenticating the user’s
credentials using the JAAS LoginModule, and then
accessing the LoginContext it returns. A call to
LoginContext.getSubject().getPrincipals() is
made, with each resulting principal passed to each
AuthorityGranter defined against the
JaasAuthenticationProvider.setAuthorityGranters(List)
property. Acegi Security does not include any production
AuthorityGranters given every JAAS principal has
an implementation-specific meaning. However, there is a
TestAuthorityGranter in the unit tests that
demonstrates a simple AuthorityGranter
implementation.
Acegi Security provides a web filter
(org.acegisecurity.ui.webapp.SiteminderAuthenticationProcessingFilter)
that can be used to process requests that have been pre-authenticated
by Computer Associates' Siteminder. This filter assumes that you're
using Siteminder for authentication, and your
application (or backing datasource) is used for
authorization. The use of Siteminder for
authorization is not yet directly supported by
Acegi.
Recall that a Siteminder agent is set up on your web server to intercept a user's first call to your application. This agent redirects the initial request to a login page, and only after successful authentication does your application receive the request. Authenticated requests contain one or more HTTP headers populated by the Siteminder agent. Below we'll assume that the request header key containing the user's identity is "SM_USER", but of course your header values may be different based on Siteminder policy server configuration. Please refer to your company's "single sign-on" group for header details.
The first step in setting up Acegi's Siteminder support is to
define an authenticationProcessingFilter bean and
give it an authenticationManager to use, as well
as to tell it where to send users upon success and failure and where
to find the Siteminder username and password values. Most people
won't need the password value since Siteminder has already
authenticated the user, so it's typical to use the same header for
both.
   <!-- ======================== SITEMINDER AUTHENTICATION PROCESSING FILTER ======================= -->
   <bean id="authenticationProcessingFilter" class="org.acegisecurity.ui.webapp.SiteminderAuthenticationProcessingFilter">
      <property name="authenticationManager"><ref bean="authenticationManager"/></property>
      <property name="authenticationFailureUrl"><value>/login.jsp?login_error=1</value></property>
      <property name="defaultTargetUrl"><value>/security.do?method=getMainMenu</value></property>
      <property name="filterProcessesUrl"><value>/j_acegi_security_check</value></property>
      <property name="siteminderUsernameHeaderKey"><value>SM_USER</value></property>
      <property name="siteminderPasswordHeaderKey"><value>SM_USER</value></property>
   </bean>
Since this authenticationProcessingFilter
depends on an authenticationManager, we'll need
to define one:
    <!-- ======================== AUTHENTICATION ======================= -->
    <!--
      - The top-level Authentication Manager is responsible for all application AUTHENTICATION
      - operations.  Note that it must reference one or more provider(s) defined below.
      -->
    <bean id="authenticationManager" class="org.acegisecurity.providers.ProviderManager">
        <property name="providers">
            <list>
                <ref local="daoAuthenticationProvider"/>
            </list>
        </property>
    </bean>
Note that your daoAuthenticationProvider
above will expect the password property to match what it expects. In
this case, authentication has already been handled by Siteminder and
you've specified the same HTTP header for both username and
password, so you can code
daoAuthenticationProvider to simply make sure the
username and password values match. This may sound like a security
weakness, but remember that users have to authenticate with
Siteminder before your application ever receives the requests, so
the purpose of your daoAuthenticationProvider
should simply be to assign roles and other properties needed by
subsequent method interceptors, etc.
Finally we need to tell the
filterChainProxy to include the
authenticationProcessingFilter in its
operations.
    <!-- ======================== FILTER CHAIN ======================= -->
    <!--
      - The web.xml file has a single filter reference to this top-level bean, which
      - invokes the chain of sub-filters specified below.
      -->
    <bean id="filterChainProxy" class="org.acegisecurity.util.FilterChainProxy">
      <property name="filterInvocationDefinitionSource">
         <value>
             CONVERT_URL_TO_LOWERCASE_BEFORE_COMPARISON
             PATTERN_TYPE_APACHE_ANT
            /**=httpSessionContextIntegrationFilter,authenticationProcessingFilter,securityEnforcementFilter
         </value>
      </property>
    </bean>
In summary, once the user has authenticated through
Siteminder, their header-loaded request will be brokered by
filterChainProxy to
authenticationProcessingFilter, which in turn
will grab the user's identity from the SM_USER request header. The
user's identity will then be passed to the
authenticationManager and finally
daoAuthenticationProvider will do the work of
authorizing the user against back-end databases, etc. and loading
the UserDetails implementation with roles,
username and any other property you deem relevant.
With the heavy use of interfaces throughout the authentication
system (Authentication,
AuthenticationManager,
AuthenticationProvider and
UserDetailsService) it might be confusing to a new
user to know which part of the authentication system to customize. In
general, the following is recommended:
Use the
UsernamePasswordAuthenticationTokenimplementation where possible.If you simply need to implement a new authentication repository (eg to obtain user details from your application’s existing database), use the
DaoAuthenticationProvideralong with theUserDetailsService. It is the fastest and safest way to integrate an external database.If you're using Container Adapters or a
RunAsManagerthat replaces theAuthenticationobject, ensure you have registered theAuthByAdapterProviderandRunAsManagerImplProviderrespectively with yourProviderManager.Never enable the
TestingAuthenticationProvideron a production system. Doing so will allow any client to simply present aTestingAuthenticationTokenand obtain whatever access they request.Adding a new
AuthenticationProvideris sufficient to support most custom authentication requirements. Only unusual requirements would require theProviderManagerto be replaced with a differentAuthenticationManager.
As briefly mentioned in the Authentication section, all
Authentication implementations are required to
store an array of GrantedAuthority objects. These
represent the authorities that have been granted to the principal. The
GrantedAuthority objects are inserted into the
Authentication object by the
AuthenticationManager and are later read by
AccessDecisionManagers when making authorization
decisions.
GrantedAuthority is an interface with only
one method:
public String getAuthority();
This method allows AccessDecisionManagers to
obtain a precise String representation of the
GrantedAuthority. By returning a representation as
a String, a GrantedAuthority can
be easily "read" by most AccessDecisionManagers. If
a GrantedAuthority cannot be precisely represented
as a String, the
GrantedAuthority is considered "complex" and
getAuthority() must return
null.
An example of a "complex" GrantedAuthority
would be an implementation that stores a list of operations and
authority thresholds that apply to different customer account numbers.
Representing this complex GrantedAuthority as a
String would be quite complex, and as a result the
getAuthority() method should return
null. This will indicate to any
AccessDecisionManager that it will need to
specifically support the GrantedAuthority
implementation in order to understand its contents.
The Acegi Security System for Spring includes one concrete
GrantedAuthority implementation,
GrantedAuthorityImpl. This allows any
user-specified String to be converted into a
GrantedAuthority. All
AuthenticationProviders included with the security
architecture use GrantedAuthorityImpl to populate
the Authentication object.
The AccessDecisionManager is called by the
AbstractSecurityInterceptor and is responsible for
making final access control decisions. The
AccessDecisionManager interface contains three
methods:
public void decide(Authentication authentication, Object object, ConfigAttributeDefinition config) throws AccessDeniedException;
public boolean supports(ConfigAttribute attribute);
public boolean supports(Class clazz);
As can be seen from the first method, the
AccessDecisionManager is passed via method
parameters all information that is likely to be of value in assessing
an authorization decision. In particular, passing the secure
Object enables those arguments contained in the
actual secure object invocation to be inspected. For example, let's
assume the secure object was a MethodInvocation. It
would be easy to query the MethodInvocation for any
Customer argument, and then implement some sort of
security logic in the AccessDecisionManager to
ensure the principal is permitted to operate on that customer.
Implementations are expected to throw an
AccessDeniedException if access is denied.
The supports(ConfigAttribute) method is
called by the AbstractSecurityInterceptor at
startup time to determine if the
AccessDecisionManager can process the passed
ConfigAttribute. The
supports(Class) method is called by a security
interceptor implementation to ensure the configured
AccessDecisionManager supports the type of secure
object that the security interceptor will present.
Whilst users can implement their own
AccessDecisionManager to control all aspects of
authorization, the Acegi Security System for Spring includes several
AccessDecisionManager implementations that are
based on voting. Figure 4 illustrates the relevant classes.

Figure 4: Voting Decision Manager
Using this approach, a series of
AccessDecisionVoter implementations are polled on
an authorization decision. The
AccessDecisionManager then decides whether or not
to throw an AccessDeniedException based on its
assessment of the votes.
The AccessDecisionVoter interface has three
methods:
public int vote(Authentication authentication, Object object, ConfigAttributeDefinition config);
public boolean supports(ConfigAttribute attribute);
public boolean supports(Class clazz);
Concrete implementations return an int, with
possible values being reflected in the
AccessDecisionVoter static fields
ACCESS_ABSTAIN, ACCESS_DENIED
and ACCESS_GRANTED. A voting implementation will
return ACCESS_ABSTAIN if it has no opinion on an
authorization decision. If it does have an opinion, it must return
either ACCESS_DENIED or
ACCESS_GRANTED.
There are three concrete
AccessDecisionManagers provided with the Acegi
Security System for Spring that tally the votes. The
ConsensusBased implementation will grant or deny
access based on the consensus of non-abstain votes. Properties are
provided to control behavior in the event of an equality of votes or
if all votes are abstain. The AffirmativeBased
implementation will grant access if one or more
ACCESS_GRANTED votes were received (ie a deny vote
will be ignored, provided there was at least one grant vote). Like the
ConsensusBased implementation, there is a parameter
that controls the behavior if all voters abstain. The
UnanimousBased provider expects unanimous
ACCESS_GRANTED votes in order to grant access,
ignoring abstains. It will deny access if there is any
ACCESS_DENIED vote. Like the other implementations,
there is a parameter that controls the behaviour if all voters
abstain.
It is possible to implement a custom
AccessDecisionManager that tallies votes
differently. For example, votes from a particular
AccessDecisionVoter might receive additional
weighting, whilst a deny vote from a particular voter may have a veto
effect.
There are two concrete AccessDecisionVoter
implementations provided with the Acegi Security System for Spring.
The RoleVoter class will vote if any
ConfigAttribute begins with ROLE_. It will vote to
grant access if there is a GrantedAuthority which
returns a String representation (via the
getAuthority() method) exactly equal to one or more
ConfigAttributes starting with
ROLE_. If there is no exact match of any
ConfigAttribute starting with
ROLE_, the RoleVoter will vote
to deny access. If no ConfigAttribute begins with
ROLE_, the voter will abstain.
RoleVoter is case sensitive on comparisons as well
as the ROLE_ prefix.
BasicAclEntryVoter is the other concrete voter included with
Acegi Security. It integrates with Acegi Security's
AclManager (discussed later). This voter is
designed to have multiple instances in the same application context,
such as:
<bean id="aclContactReadVoter" class="org.acegisecurity.vote.BasicAclEntryVoter">
  <property name="processConfigAttribute"><value>ACL_CONTACT_READ</value></property>
  <property name="processDomainObjectClass"><value>sample.contact.Contact</value></property>
  <property name="aclManager"><ref local="aclManager"/></property>
  <property name="requirePermission">
    <list>
      <ref local="org.acegisecurity.acl.basic.SimpleAclEntry.ADMINISTRATION"/>
      <ref local="org.acegisecurity.acl.basic.SimpleAclEntry.READ"/>
    </list>
  </property>
</bean>

<bean id="aclContactDeleteVoter" class="org.acegisecurity.vote.BasicAclEntryVoter">
  <property name="processConfigAttribute"><value>ACL_CONTACT_DELETE</value></property>
  <property name="processDomainObjectClass"><value>sample.contact.Contact</value></property>
  <property name="aclManager"><ref local="aclManager"/></property>
  <property name="requirePermission">
    <list>
      <ref local="org.acegisecurity.acl.basic.SimpleAclEntry.ADMINISTRATION"/>
      <ref local="org.acegisecurity.acl.basic.SimpleAclEntry.DELETE"/>
    </list>
  </property>
</bean>
In the above example, you'd define
ACL_CONTACT_READ or
ACL_CONTACT_DELETE against some methods on a
MethodSecurityInterceptor or
AspectJSecurityInterceptor. When those methods are
invoked, the above applicable voter defined above would vote to grant
or deny access. The voter would look at the method invocation to
locate the first argument of type
sample.contact.Contact, and then pass that
Contact to the AclManager. The
AclManager will then return an access control list
(ACL) that applies to the current Authentication.
Assuming that ACL contains one of the listed
requirePermissions, the voter will vote to grant
access. If the ACL does not contain one of the permissions defined
against the voter, the voter will vote to deny access.
BasicAclEntryVoter is an important class as it
allows you to build truly complex applications with domain object
security entirely defined in the application context. If you're
interested in learning more about Acegi Security's ACL capabilities
and how best to apply them, please see the ACL and "After Invocation"
sections of this reference guide, and the Contacts sample
application.
It is also possible to implement a custom
AccessDecisionVoter. Several examples are provided
in the Acegi Security System for Spring unit tests, including
ContactSecurityVoter and
DenyVoter. The
ContactSecurityVoter abstains from voting decisions
where a CONTACT_OWNED_BY_CURRENT_USER
ConfigAttribute is not found. If voting, it queries
the MethodInvocation to extract the owner of the
Contact object that is subject of the method call.
It votes to grant access if the Contact owner
matches the principal presented in the
Authentication object. It could have just as easily
compared the Contact owner with some
GrantedAuthority the
Authentication object presented. All of this is
achieved with relatively few lines of code and demonstrates the
flexibility of the authorization model.
The Acegi Security System for Spring comes bundled with several
JSP tag libraries that eases JSP writing. The tag libraries are known
as authz and provide a range of different
services.
All taglib classes are included in the core
acegi-security-xx.jar file, with the
authz.tld located in the JAR's
META-INF directory. This means for JSP 1.2+ web
containers you can simply include the JAR in the WAR's
WEB-INF/lib directory and it will be available. If
you're using a JSP 1.1 container, you'll need to declare the JSP
taglib in your web.xml file, and include
authz.tld in the WEB-INF/lib
directory. The following fragment is added to
web.xml:
<taglib>
       <taglib-uri>http://acegisecurity.sf.net/authz</taglib-uri>
       <taglib-location>/WEB-INF/authz.tld</taglib-location>
</taglib>AuthorizeTag is used to include content if
the current principal holds certain
GrantedAuthoritys.
The following JSP fragment illustrates how to use the
AuthorizeTag:
<authz:authorize ifAllGranted="ROLE_SUPERVISOR">
  <td>
    <A HREF="del.htm?id=<c:out value="${contact.id}"/>">Del</A>
  </td>
</authz:authorize>
This tag would cause the tag's body to be output if the principal has been granted ROLE_SUPERVISOR.
The authz:authorize tag declares the
following attributes:
ifAllGranted: All the listed roles must be granted for the tag to output its body.ifAnyGranted: Any of the listed roles must be granted for the tag to output its body.ifNotGranted: None of the listed roles must be granted for the tag to output its body.
You'll note that in each attribute you can list multiple
roles. Simply separate the roles using a comma. The
authorize tag ignores whitespace in
attributes.
The tag library logically ANDs all of it's parameters
together. This means that if you combine two or more attributes, all
attributes must be true for the tag to output it's body. Don't add
an ifAllGranted="ROLE_SUPERVISOR", followed by an
ifNotGranted="ROLE_SUPERVISOR", or you'll be
surprised to never see the tag's body.
By requiring all attributes to return true, the authorize tag
allows you to create more complex authorization scenarios. For
example, you could declare an
ifAllGranted="ROLE_SUPERVISOR" and an
ifNotGranted="ROLE_NEWBIE_SUPERVISOR" in the same
tag, in order to prevent new supervisors from seeing the tag body.
However it would no doubt be simpler to use
ifAllGranted="ROLE_EXPERIENCED_SUPERVISOR" rather
than inserting NOT conditions into your design.
One last item: the tag verifies the authorizations in a
specific order: first ifNotGranted, then
ifAllGranted, and finally,
ifAnyGranted.
AuthenticationTag is used to simply output
a property of the current principal's
Authentication.getPrincipal() object to the web
page.
The following JSP fragment illustrates how to use the
AuthenticationTag:
<authz:authentication operation="username"/>
This tag would cause the principal's name to be output. Here
we are assuming the Authentication.getPrincipal()
is a UserDetails object, which is generally the
case when using the typical
DaoAuthenticationProvider.
AclTag is used to include content if the
current principal has a ACL to the indicated domain object.
The following JSP fragment illustrates how to use the
AclTag:
<authz:acl domainObject="${contact}" hasPermission="16,1">
  <td><A HREF="<c:url value="del.htm"><c:param name="contactId" value="${contact.id}"/></c:url>">Del</A></td>
</authz:acl>
This tag would cause the tag's body to be output if the
principal holds either permission 16 or permission 1 for the
"contact" domain object. The numbers are actually integers that are
used with AbstractBasicAclEntry bit masking.
Please refer tro the ACL section of this reference guide to
understand more about the ACL capabilities of Acegi Security.
Given there are several ways to achieve similar authorization outcomes in the Acegi Security System for Spring, the following general recommendations are made:
Grant authorities using
GrantedAuthorityImplwhere possible. Because it is already supported by the Acegi Security System for Spring, you avoid the need to create customAuthenticationManagerorAuthenticationProviderimplementations simply to populate theAuthenticationobject with a customGrantedAuthority.Writing an
AccessDecisionVoterimplementation and using eitherConsensusBased,AffirmativeBasedorUnanimousBasedas theAccessDecisionManagermay be the best approach to implementing your custom access decision rules.
Whilst the AccessDecisionManager is called by
the AbstractSecurityInterceptor before proceeding
with the secure object invocation, some applications need a way of
modifying the object actually returned by the secure object
invocation. Whilst you could easily implement your own AOP concern to
achieve this, Acegi Security provides a convenient hook that has
several concrete implementations that integrate with its ACL
capabilities.
Figure 5 illustrates Acegi Security's
AfterInvocationManager and its concrete
implementations.

Figure 5: After Invocation Implementation
Like many other parts of Acegi Security,
AfterInvocationManager has a single concrete
implementation, AfterInvocationProvider, which
polls a list of AfterInvocationProviders. Each
AfterInvocationProvider is allowed to modify the
return object or throw an AccessDeniedException.
Indeed multiple providers can modify the object, as the result of the
previous provider is passed to the next in the list. Let's now
consider our ACL-aware implementations of
AfterInvocationProvider.
Please be aware that if you're using
AfterInvocationManager, you will still need
configuration attributes that allow the
MethodSecurityInterceptor's
AccessDecisionManager to allow an operation. If
you're using the typical Acegi Security included
AccessDecisionManager implementations, having no
configuration attributes defined for a particular secure method
invocation will cause each AccessDecisionVoter to
abstain from voting. In turn, if the
AccessDecisionManager property
"allowIfAllAbstainDecisions" is
false, an AccessDeniedException
will be thrown. You may avoid this potential issue by either (i)
setting "allowIfAllAbstainDecisions" to
true (although this is generally not recommended)
or (ii) simply ensure that there is at least one configuration
attribute that an AccessDecisionVoter will vote to
grant access for. This latter (recommended) approach is usually
achieved through a ROLE_USER or
ROLE_AUTHENTICATED configuration attribute.
A common services layer method we've all written at one stage or another looks like this:
public Contact getById(Integer id);
Quite often, only principals with permission to read the
Contact should be allowed to obtain it. In this
situation the AccessDecisionManager approach
provided by the AbstractSecurityInterceptor will
not suffice. This is because the identity of the
Contact is all that is available before the secure
object is invoked. The
BasicAclAfterInvocationProvider delivers a
solution, and is configured as follows:
<bean id="afterAclRead" class="org.acegisecurity.afterinvocation.BasicAclEntryAfterInvocationProvider">
  <property name="aclManager"><ref local="aclManager"/></property>
  <property name="requirePermission">
    <list>
      <ref local="org.acegisecurity.acl.basic.SimpleAclEntry.ADMINISTRATION"/>
      <ref local="org.acegisecurity.acl.basic.SimpleAclEntry.READ"/>
    </list>
  </property>
</bean>
In the above example, the Contact will be
retrieved and passed to the
BasicAclEntryAfterInvocationProvider. The provider
will thrown an AccessDeniedException if one of the
listed requirePermissions is not held by the
Authentication. The
BasicAclEntryAfterInvocationProvider queries the
AclManager to determine the ACL that applies for
this domain object to this Authentication.
Similar to the
BasicAclEntryAfterInvocationProvider is
BasicAclEntryAfterInvocationCollectionFilteringProvider.
It is designed to remove Collection or array
elements for which a principal does not have access. It never thrown
an AccessDeniedException - simply silently removes
the offending elements. The provider is configured as follows:
<bean id="afterAclCollectionRead" class="org.acegisecurity.afterinvocation.BasicAclEntryAfterInvocationCollectionFilteringProvider">
  <property name="aclManager"><ref local="aclManager"/></property>
  <property name="requirePermission">
    <list>
      <ref local="org.acegisecurity.acl.basic.SimpleAclEntry.ADMINISTRATION"/>
      <ref local="org.acegisecurity.acl.basic.SimpleAclEntry.READ"/>
    </list>
  </property>
</bean>
As you can imagine, the returned Object must
be a Collection or array for this provider to
operate. It will remove any element if the
AclManager indicates the
Authentication does not hold one of the listed
requirePermissions.
The Contacts sample application demonstrates these two
AfterInvocationProviders.
The AbstractSecurityInterceptor is able to
temporarily replace the Authentication object in
the SecurityContext and
SecurityContextHolder during the
SecurityInterceptorCallback. This only occurs if
the original Authentication object was successfully
processed by the AuthenticationManager and
AccessDecisionManager. The
RunAsManager will indicate the replacement
Authentication object, if any, that should be used
during the SecurityInterceptorCallback.
By temporarily replacing the Authentication
object during a SecurityInterceptorCallback, the
secured invocation will be able to call other objects which require
different authentication and authorization credentials. It will also
be able to perform any internal security checks for specific
GrantedAuthority objects. Because Acegi Security
provides a number of helper classes that automatically configure
remoting protocols based on the contents of the
ContextHolder, these run-as replacements are
particularly useful when calling remote web services.
A RunAsManager interface is provided by the
Acegi Security System for Spring:
public Authentication buildRunAs(Authentication authentication, Object object, ConfigAttributeDefinition config);
public boolean supports(ConfigAttribute attribute);
public boolean supports(Class clazz);
The first method returns the Authentication
object that should replace the existing
Authentication object for the duration of the
method invocation. If the method returns null, it
indicates no replacement should be made. The second method is used by
the AbstractSecurityInterceptor as part of its
startup validation of configuration attributes. The
supports(Class) method is called by a security
interceptor implementation to ensure the configured
RunAsManager supports the type of secure object
that the security interceptor will present.
One concrete implementation of a RunAsManager
is provided with the Acegi Security System for Spring. The
RunAsManagerImpl class returns a replacement
RunAsUserToken if any
ConfigAttribute starts with
RUN_AS_. If any such
ConfigAttribute is found, the replacement
RunAsUserToken will contain the same principal,
credentials and granted authorities as the original
Authentication object, along with a new
GrantedAuthorityImpl for each
RUN_AS_ ConfigAttribute. Each
new GrantedAuthorityImpl will be prefixed with
ROLE_, followed by the RUN_AS
ConfigAttribute. For example, a
RUN_AS_SERVER will result in the replacement
RunAsUserToken containing a
ROLE_RUN_AS_SERVER granted authority.
The replacement RunAsUserToken is just like
any other Authentication object. It needs to be
authenticated by the AuthenticationManager,
probably via delegation to a suitable
AuthenticationProvider. The
RunAsImplAuthenticationProvider performs such
authentication. It simply accepts as valid any
RunAsUserToken presented.
To ensure malicious code does not create a
RunAsUserToken and present it for guaranteed
acceptance by the RunAsImplAuthenticationProvider,
the hash of a key is stored in all generated tokens. The
RunAsManagerImpl and
RunAsImplAuthenticationProvider is created in the
bean context with the same key:
<bean id="runAsManager" class="org.acegisecurity.runas.RunAsManagerImpl">
  <property name="key"><value>my_run_as_password</value></property>
</bean>
<bean id="runAsAuthenticationProvider" class="org.acegisecurity.runas.RunAsImplAuthenticationProvider">
  <property name="key"><value>my_run_as_password</value></property>
</bean>
By using the same key, each RunAsUserToken
can be validated it was created by an approved
RunAsManagerImpl. The
RunAsUserToken is immutable after creation for
security reasons.
Everything presented so far assumes one thing: the
SecurityContextHolder is populated with a valid
SecurityContext, which in turn contains a valid
Authentication object. Developers are free to do
this in whichever way they like, such as directly calling the relevant
objects at runtime. However, several classes have been provided to
make this process transparent in many situations. We call these
classes "authentication mechanisms".
The org.acegisecurity.ui package provides
what we call "authentication processing mechanisms". An authentication
processing mechanism is solely concerned with received an
authentication request from the principal, testing if it seems valid,
and if so, placing the authentication request token onto the
SecurityContextHolder. Of course, if the
authentication request is invalid, the authentication processing
mechanism is responsible for informing the principal in whatever way
is appropriate to the protocol.
Recall the
HttpSessionContextIntegrationFilter (discussed in
the context section) is responsible for storing the
SecurityContextHolder contents between invocations.
This means no authentication processing mechanism need ever interact
directly with HttpSession. Indeed
HttpSessionContextIntegrationFilter has been
designed to minimise the unnecessary creation of
HttpSessions, as might occur when using Basic
authentication for example.
There are several authentication processing mechanisms included with Acegi Security, which will be briefly discussed in this chapter. The most popular (and almost always recommended) approach is HTTP Form Authentication, which uses a login form to authenticate the user. Another approach (commonly use with web services) is HTTP Basic Authentication, which allows clients to use HTTP headers to present authentication information to the Acegi Security System for Spring. Alternatively, you can also use Yale Central Authentication Service (CAS) for enterprise-wide single sign on. The final (and generally unrecommended) approach is via Container Adapters, which allow supported web containers to perform the authentication themselves. HTTP Form Authentication and Basic Authentication is discussed below, whilst CAS and Container Adapters are discussed in separate sections of this document.
HTTP Form Authentication involves using the
AuthenticationProcessingFilter to process a login
form. The login form simply contains j_username and
j_password input fields, and posts to a URL that is
monitored by the filter (by default
j_acegi_security_check). The filter is defined in
web.xml behind a
FilterToBeanProxy as follows:
<filter>
  <filter-name>Acegi Authentication Processing Filter</filter-name>
  <filter-class>org.acegisecurity.util.FilterToBeanProxy</filter-class>
  <init-param>
    <param-name>targetClass</param-name>
    <param-value>org.acegisecurity.ui.webapp.AuthenticationProcessingFilter</param-value>
  </init-param>
</filter>

<filter-mapping>
  <filter-name>Acegi Authentication Processing Filter</filter-name>
  <url-pattern>/*</url-pattern>
</filter-mapping>
For a discussion of FilterToBeanProxy, please
refer to the Filters section. The application context will need to
define the AuthenticationProcessingFilter:
<bean id="authenticationProcessingFilter" class="org.acegisecurity.ui.webapp.AuthenticationProcessingFilter">
  <property name="authenticationManager"><ref bean="authenticationManager"/></property>
  <property name="authenticationFailureUrl"><value>/acegilogin.jsp?login_error=1</value></property>
  <property name="defaultTargetUrl"><value>/</value></property>
  <property name="filterProcessesUrl"><value>/j_acegi_security_check</value></property>
</bean>
The configured AuthenticationManager
processes each authentication request. If authentication fails, the
browser will be redirected to the
authenticationFailureUrl. The
AuthenticationException will be placed into the
HttpSession attribute indicated by
AbstractProcessingFilter.ACEGI_SECURITY_LAST_EXCEPTION_KEY,
enabling a reason to be provided to the user on the error page.
If authentication is successful, the resulting
Authentication object will be placed into the
SecurityContextHolder.
Once the SecurityContextHolder has been
updated, the browser will need to be redirected to the target URL. The
target URL is usually indicated by the HttpSession
attribute specified by
AbstractProcessingFilter.ACEGI_SECURITY_TARGET_URL_KEY.
This attribute is automatically set by the
SecurityEnforcementFilter when an
AuthenticationException occurs, so that after login
is completed the user can return to what they were trying to access.
If for some reason the HttpSession does not
indicate the target URL, the browser will be redirected to the
defaultTargetUrl property.
Because this authentication approach is fully contained within a single web application, HTTP Form Authentication is recommended to be used instead of Container Adapters.
The Acegi Security System for Spring provides a
BasicProcessingFilter which is capable of
processing basic authentication credentials presented in HTTP headers.
This can be used for authenticating calls made by Spring remoting
protocols (such as Hessian and Burlap), as well as normal user agents
(such as Internet Explorer and Navigator). The standard governing HTTP
Basic Authentication is defined by RFC 1945, Section 11, and the
BasicProcessingFilter conforms with this RFC. Basic
Authentication is an attractive approach to authentication, because it
is very widely deployed in user agents and implementation is extremely
simple (it's just a Base64 encoding of the username:password,
specified in a HTTP header).
To implement HTTP Basic Authentication, it is necessary to
define BasicProcessingFilter in the fitler chain.
The application context will need to define the
BasicProcessingFilter and its required
collaborator:
<bean id="basicProcessingFilter" class="org.acegisecurity.ui.basicauth.BasicProcessingFilter">
  <property name="authenticationManager"><ref bean="authenticationManager"/></property>
  <property name="authenticationEntryPoint"><ref bean="authenticationEntryPoint"/></property>
</bean>

<bean id="authenticationEntryPoint" class="org.acegisecurity.ui.basicauth.BasicProcessingFilterEntryPoint">
  <property name="realmName"><value>Name Of Your Realm</value></property>
</bean>
The configured AuthenticationManager
processes each authentication request. If authentication fails, the
configured AuthenticationEntryPoint will be used to
retry the authentication process. Usually you will use the
BasicProcessingFilterEntryPoint, which returns a
401 response with a suitable header to retry HTTP Basic
authentication. If authentication is successful, the resulting
Authentication object will be placed into the
SecurityContextHolder.
If the authentication event was successful, or authentication
was not attempted because the HTTP header did not contain a supported
authentication request, the filter chain will continue as normal. The
only time the filter chain will be interrupted is if authentication
fails and the AuthenticationEntryPoint is called,
as discussed in the previous paragraph.
The Acegi Security System for Spring provides a
DigestProcessingFilter which is capable of
processing digest authentication credentials presented in HTTP
headers. Digest Authentication attempts to solve many of the
weakenesses of Basic authentication, specifically by ensuring
credentials are never sent in clear text across the wire. Many user
agents support Digest Authentication, including FireFox and Internet
Explorer. The standard governing HTTP Digest Authentication is defined
by RFC 2617, which updates an earlier version of the Digest
Authentication standard prescribed by RFC 2069. Most user agents
implement RFC 2617. The Acegi Security
DigestProcessingFilter is compatible with the
"auth" quality of protection
(qop) prescribed by RFC 2617, which also provides
backward compatibility with RFC 2069. Digest Authentication is a
highly attractive option if you need to use unencrypted HTTP (ie no
TLS/HTTPS) and wish to maximise security of the authentication
process. Indeed Digest Authentication is a mandatory requirement for
the WebDAV protocol, as noted by RFC 2518 Section 17.1, so we should
expect to see it increasingly deployed and replacing Basic
Authentication.
Digest Authentication is definitely the most secure choice between Form Authentication, Basic Authentication and Digest Authentication, although extra security also means more complex user agent implementations. Central to Digest Authentication is a "nonce". This is a value the server generates. Acegi Security's nonce adopts the following format:
base64(expirationTime + ":" + md5Hex(expirationTime + ":" + key))

expirationTime:   The date and time when the nonce expires, expressed in milliseconds
key:              A private key to prevent modification of the nonce token
The DigestProcessingFilterEntryPoint has a
property specifying the key used for generating the
nonce tokens, along with a nonceValiditySeconds
property for determining the expiration time (default 300, which
equals five minutes). Whilstever the nonce is valid, the digest is
computed by concatenating various strings including the username,
password, nonce, URI being requested, a client-generated nonce (merely
a random value which the user agent generates each request), the realm
name etc, then performing an MD5 hash. Both the server and user agent
perform this digest computation, resulting in different hash codes if
they disagree on an included value (eg password). In the Acegi
Security implementation, if the server-generated nonce has merely
expired (but the digest was otherwise valid), the
DigestProcessingFilterEntryPoint will send a
"stale=true" header. This tells the user agent
there is no need to disturb the user (as the password and username etc
is correct), but simply to try again using a new nonce.
An appropriate value for
DigestProcessingFilterEntryPoint's
nonceValiditySeconds parameter will depend on your
application. Extremely secure applications should note that an
intercepted authentication header can be used to impersonate the
principal until the expirationTime contained in the
nonce is reached. This is the key principle when selecting an
appropriate setting, but it would be unusual for immensly secure
applications to not be running over TLS/HTTPS in the first
instance.
Because of the more complex implementation of Digest
Authentication, there are often user agent issues. For example,
Internet Explorer fails to present an "opaque"
token on subsequent requests in the same session. The Acegi Security
filters therefore encapsulate all state information into the
"nonce" token instead. In our testing, the Acegi
Security implementation works reliably with FireFox and Internet
Explorer, correctly handling nonce timeouts etc.
Now that we've reviewed the theory, let's see how to use it. To
implement HTTP Digest Authentication, it is necessary to define
DigestProcessingFilter in the fitler chain. The
application context will need to define the
DigestProcessingFilter and its required
collaborators:
<bean id="digestProcessingFilter" class="org.acegisecurity.ui.digestauth.DigestProcessingFilter">
  <property name="userDetailsService"><ref local="jdbcDaoImpl"/></property>
  <property name="authenticationEntryPoint"><ref local="digestProcessingFilterEntryPoint"/></property>
  <property name="userCache"><ref local="userCache"/></property>
</bean>

<bean id="digestProcessingFilterEntryPoint" class="org.acegisecurity.ui.digestauth.DigestProcessingFilterEntryPoint">
  <property name="realmName"><value>Contacts Realm via Digest Authentication</value></property>
  <property name="key"><value>acegi</value></property>
  <property name="nonceValiditySeconds"><value>10</value></property>
</bean>
The configured UserDetailsService is needed
because DigestProcessingFilter must have direct
access to the clear text password of a user. Digest Authentication
will NOT work if you are using encoded passwords in your DAO. The DAO
collaborator, along with the UserCache, are
typically shared directly with a
DaoAuthenticationProvider. The
authenticationEntryPoint property must be
DigestProcessingFilterEntryPoint, so that
DigestProcessingFilter can obtain the correct
realmName and key for digest
calculations.
Like BasicAuthenticationFilter, if
authentication is successful an Authentication
request token will be placed into the
SecurityContextHolder. If the authentication event
was successful, or authentication was not attempted because the HTTP
header did not contain a Digest Authentication request, the filter
chain will continue as normal. The only time the filter chain will be
interrupted is if authentication fails and the
AuthenticationEntryPoint is called, as discussed in
the previous paragraph.
Digest Authentication's RFC offers a range of additional features to further increase security. For example, the nonce can be changed on every request. Despite this, the Acegi Security implementation was designed to minimise the complexity of the implementation (and the doubtless user agent incompatibilities that would emerge), and avoid needing to store server-side state. You are invited to review RFC 2617 if you wish to explore these features in more detail. As far as we are aware, the Acegi Security implementation does comply with the minimum standards of this RFC.
Particularly in the case of web request URI security, sometimes
it is more convenient to assign configuration attributes against every
possible secure object invocation. Put differently, sometimes it is
nice to say ROLE_SOMETHING is required by default
and only allow certain exceptions to this rule, such as for login,
logout and home pages of an application. There are also other
situations where anonymous authentication would be desired, such as
when an auditing interceptor queries the
SecurityContextHolder to identify which principal
was responsible for a given operation. Such classes can be authored
with more robustness if they know the
SecurityContextHolder always contains an
Authentication object, and never
null.
Acegi Security provides three classes that together provide an
anoymous authentication feature.
AnonymousAuthenticationToken is an implementation
of Authentication, and stores the
GrantedAuthority[]s which apply to the anonymous
principal. There is a corresponding
AnonymousAuthenticationProvider, which is chained
into the ProviderManager so that
AnonymousAuthenticationTokens are accepted.
Finally, there is an AnonymousProcessingFilter, which is chained after
the normal authentication mechanisms and automatically add an
AnonymousAuthenticationToken to the
SecurityContextHolder if there is no existing
Authentication held there. The definition of the
filter and authentication provider appears as follows:
<bean id="anonymousProcessingFilter" class="org.acegisecurity.providers.anonymous.AnonymousProcessingFilter">
  <property name="key"><value>foobar</value></property>
  <property name="userAttribute"><value>anonymousUser,ROLE_ANONYMOUS</value></property>
</bean>

<bean id="anonymousAuthenticationProvider" class="org.acegisecurity.providers.anonymous.AnonymousAuthenticationProvider">
  <property name="key"><value>foobar</value></property>
</bean>
The key is shared between the filter and
authentication provider, so that tokens created by the former are
accepted by the latter. The userAttribute is
expressed in the form of
usernameInTheAuthenticationToken,grantedAuthority[,grantedAuthority].
This is the same syntax as used after the equals sign for
InMemoryDaoImpl's userMap
property.
As explained earlier, the benefit of anonymous authentication is that all URI patterns can have security applied to them. For example:
<bean id="filterInvocationInterceptor" class="org.acegisecurity.intercept.web.FilterSecurityInterceptor">
  <property name="authenticationManager"><ref bean="authenticationManager"/></property>
  <property name="accessDecisionManager"><ref local="httpRequestAccessDecisionManager"/></property>
  <property name="objectDefinitionSource">
    <value>
      CONVERT_URL_TO_LOWERCASE_BEFORE_COMPARISON
      PATTERN_TYPE_APACHE_ANT
      /index.jsp=ROLE_ANONYMOUS,ROLE_USER
      /hello.htm=ROLE_ANONYMOUS,ROLE_USER
      /logoff.jsp=ROLE_ANONYMOUS,ROLE_USER
      /acegilogin.jsp*=ROLE_ANONYMOUS,ROLE_USER
      /**=ROLE_USER
    </value>
  </property>
</bean>
Rounding out the anonymous authentication
discussion is the AuthenticationTrustResolver
interface, with its corresponding
AuthenticationTrustResolverImpl implementation.
This interface provides an
isAnonymous(Authentication) method, which allows
interested classes to take into account this special type of
authentication status. The
SecurityEnforcementFilter uses this interface in
processing AccessDeniedExceptions. If an
AccessDeniedException is thrown, and the
authentication is of an anonymous type, instead of throwing a 403
(forbidden) response, the filter will instead commence the
AuthenticationEntryPoint so the principal can
authenticate properly. This is a necessary distinction, otherwise
principals would always be deemed "authenticated" and never be given
an opportunity to login via form, basic, digest or some other normal
authentication mechanism.Remember-me authentication refers to web sites being able to remember the identity of a principal between sessions. This is typically accomplished by sending a cookie to the browser, with the cookie being detected during future sessions and causing automated login to take place. Acegi Security provides the necessary hooks so that such operations can take place, along with providing a concrete implementation that uses hashing to preserve the security of cookie-based tokens.
Remember-me authentication is not used with digest or basic
authentication, given they are often not used with
HttpSessions. Remember-me is used with
AuthenticationProcessingFilter, and is implemented
via hooks in the AbstractProcessingFilter
superclass. The hooks will invoke a concrete
RememberMeServices at the appropriate times. The
interface looks like this:
public Authentication autoLogin(HttpServletRequest request, HttpServletResponse response);
public void loginFail(HttpServletRequest request, HttpServletResponse response);
public void loginSuccess(HttpServletRequest request, HttpServletResponse response, Authentication successfulAuthentication);
Please refer to JavaDocs for a fuller discussion on what the
methods do, although note at this stage
AbstractProcessingFilter only calls the
loginFail() and loginSuccess()
methods. The autoLogin() method is called by
RememberMeProcessingFilter whenever the
SecurityContextHolder does not contain an
Authentication. This interface therefore provides
the underlaying remember-me implementation with sufficient
notification of authentication-related events, and delegates to the
implementation whenever a candidate web request might contain a cookie
and wish to be remembered.
This design allows any number of remember-me implementation
strategies. In the interests of simplicity and avoiding the need for
DAO implementations that specify write and create methods, Acegi
Security's only concrete implementation,
TokenBasedRememberMeServices, uses hashing to
achieve a useful remember-me strategy. In essence a cookie is sent to
the browser upon successful interactive authentication, with that
cookie being composed as follows:
base64(username + ":" + expirationTime + ":" + md5Hex(username + ":" + expirationTime + ":" password + ":" + key))

username:         As identifiable to TokenBasedRememberMeServices.getUserDetailsService()
password:         That matches the relevant UserDetails retrieved from TokenBasedRememberMeServices.getUserDetailsService()
expirationTime:   The date and time when the remember-me token expires, expressed in milliseconds
key:              A private key to prevent modification of the remember-me token
As such the remember-me token is valid only for the period specified, and provided that the username, password and key does not change. Notably, this has a potential security issue issue in that a captured remember-me token will be usable from any user agent until such time as the token expires. This is the same issue as with digest authentication. If a principal is aware a token has been captured, they can easily change their password and immediately invalidate all remember-me tokens on issue. However, if more significant security is needed a rolling token approach should be used (this would require a database) or remember-me services should simply not be used.
TokenBasedRememberMeServices generates a
RememberMeAuthenticationToken, which is processed
by RememberMeAuthenticationProvider. A
key is shared between this authentication provider
and the TokenBasedRememberMeServices. In addition,
TokenBasedRememberMeServices requires A
UserDetailsService from which it can retrieve the username and
password for signature comparison purposes, and generate the
RememberMeAuthenticationToken to contain the
correct GrantedAuthority[]s. Some sort of logout
command should be provided by the application (typically via a JSP)
that invalidates the cookie upon user request. See the Contacts Sample
application's logout.jsp for an example.
The beans required in an application context to enable remember-me services are as follows:
<bean id="rememberMeProcessingFilter" class="org.acegisecurity.ui.rememberme.RememberMeProcessingFilter">
  <property name="rememberMeServices"><ref local="rememberMeServices"/></property>
</bean>

<bean id="rememberMeServices" class="org.acegisecurity.ui.rememberme.TokenBasedRememberMeServices">
  <property name="userDetailsService"><ref local="jdbcDaoImpl"/></property>
  <property name="key"><value>springRocks</value></property>
</bean>

<bean id="rememberMeAuthenticationProvider" class="org.acegisecurity.providers.rememberme.RememberMeAuthenticationProvider">
  <property name="key"><value>springRocks</value></property>
</bean>
Don't forget to add your
RememberMeServices implementation to your
AuthenticationProcessingFilter.setRememberMeServices()
property, include the
RememberMeAuthenticationProvider in your
AuthenticationManager.setProviders() list, and add
a call to RememberMeProcessingFilter into your
FilterChainProxy (typically immediately after your
AuthenticationProcessingFilter).Prior to release 0.8.0, Acegi Security referred to "well-known
locations" in discussions about storing the
Authentication. This approach did not explicitly
separate the function of HttpSession storage of
SecurityContextHolder contents from the processing
of authentication requests received through various protocols. In
addition, the previous approach did not facilitate storage of
non-Authentication objects between requests, which
was limiting usefulness of the
SecurityContextHolder system to member of the
community. For these reasons, the notion of well-known locations was
abandoned, the HttpSessionContextIntegrationFilter
was established, and the purpose of authentication processing
mechanisms was explicitly defined and limited to interaction with the
SecurityContextHolder only. There is no need to
refer to well-known locations any more and we hope this clearer
separation of responsibilities enhances understanding of the
design.
Very early versions of the Acegi Security System for Spring exclusively used Container Adapters for interfacing authentication with end users. Whilst this worked well, it required considerable time to support multiple container versions and the configuration itself was relatively time-consuming for developers. For this reason the HTTP Form Authentication and HTTP Basic Authentication approaches were developed, and are today recommended for almost all applications.
Container Adapters enable the Acegi Security System for Spring
to integrate directly with the containers used to host end user
applications. This integration means that applications can continue to
leverage the authentication and authorization capabilities built into
containers (such as isUserInRole() and form-based
or basic authentication), whilst benefiting from the enhanced security
interception capabilities provided by the Acegi Security System for
Spring (it should be noted that Acegi Security also offers
ContextHolderAwareRequestWrapper to deliver
isUserInRole() and similar Servlet Specification
compatibility methods).
The integration between a container and the Acegi Security System for Spring is achieved through an adapter. The adapter provides a container-compatible user authentication provider, and needs to return a container-compatible user object.
The adapter is instantiated by the container and is defined in a
container-specific configuration file. The adapter then loads a Spring
application context which defines the normal authentication manager
settings, such as the authentication providers that can be used to
authenticate the request. The application context is usually named
acegisecurity.xml and is placed in a
container-specific location.
The Acegi Security System for Spring currently supports Jetty, Catalina (Tomcat), JBoss and Resin. Additional container adapters can easily be written.
As is always the case, the container adapter generated
Authentication object still needs to be
authenticated by an AuthenticationManager when
requested to do so by the
AbstractSecurityInterceptor. The
AuthenticationManager needs to be certain the
adapter-provided Authentication object is valid and
was actually authenticated by a trusted adapter.
Adapters create Authentication objects which
are immutable and implement the AuthByAdapter
interface. These objects store the hash of a key that is defined by
the adapter. This allows the Authentication object
to be validated by the AuthByAdapterProvider. This
authentication provider is defined as follows:
<bean id="authByAdapterProvider" class="org.acegisecurity.adapters.AuthByAdapterProvider">
  <property name="key"><value>my_password</value></property>
</bean>
The key must match the key that is defined in the
container-specific configuration file that starts the adapter. The
AuthByAdapterProvider automatically accepts as
valid any AuthByAdapter implementation that returns
the expected hash of the key.
To reiterate, this means the adapter will perform the initial
authentication using providers such as
DaoAuthenticationProvider, returning an
AuthByAdapter instance that contains a hash code of
the key. Later, when an application calls a security interceptor
managed resource, the AuthByAdapter instance in the
SecurityContext in the
SecurityContextHolder will be tested by the
application's AuthByAdapterProvider. There is no
requirement for additional authentication providers such as
DaoAuthenticationProvider within the
application-specific application context, as the only type of
Authentication instance that will be presented by
the application is from the container adapter.
Classloader issues are frequent with containers and the use of container adapters illustrates this further. Each container requires a very specific configuration. The installation instructions are provided below. Once installed, please take the time to try the sample application to ensure your container adapter is properly configured.
When using container adapters with the
DaoAuthenticationProvider, ensure you set its
forcePrincipalAsString property to
true.
The following was tested with Jakarta Tomcat 4.1.30 and 5.0.19.
$CATALINA_HOME refers to the root of your
Catalina (Tomcat) installation.
Edit your $CATALINA_HOME/conf/server.xml file
so the <Engine> section contains only one
active <Realm> entry. An example realm
entry:
      <Realm className="org.acegisecurity.adapters.catalina.CatalinaAcegiUserRealm"
             appContextLocation="conf/acegisecurity.xml"
             key="my_password" />
Be sure to remove any other <Realm>
entry from your <Engine> section.
Copy acegisecurity.xml into
$CATALINA_HOME/conf.
Copy acegi-security-catalina-XX.jar into
$CATALINA_HOME/server/lib.
Copy the following files into
$CATALINA_HOME/common/lib:
aopalliance.jarspring.jarcommons-codec.jarburlap.jarhessian.jar
None of the above JAR files (or
acegi-security-XX.jar) should be in your
application's WEB-INF/lib. The realm name indicated
in your web.xml does not matter with
Catalina.
We have received reports of problems using this Container Adapter with Mac OS X. A work-around is to use a script such as follows:
#!/bin/sh
export CATALINA_HOME="/Library/Tomcat"
export JAVA_HOME="/Library/Java/Home"
cd /
$CATALINA_HOME/bin/startup.sh
The following was tested with Jetty 4.2.18.
$JETTY_HOME refers to the root of your Jetty
installation.
Edit your $JETTY_HOME/etc/jetty.xml file so
the <Configure class> section has a new
addRealm call:
  <Call name="addRealm">
    <Arg>
      <New class="org.acegisecurity.adapters.jetty.JettyAcegiUserRealm">
        <Arg>Spring Powered Realm</Arg>
        <Arg>my_password</Arg>
        <Arg>etc/acegisecurity.xml</Arg>
      </New>
    </Arg>
  </Call>
Copy acegisecurity.xml into
$JETTY_HOME/etc.
Copy the following files into
$JETTY_HOME/ext:
aopalliance.jarcommons-logging.jarspring.jaracegi-security-jetty-XX.jarcommons-codec.jarburlap.jarhessian.jar
None of the above JAR files (or
acegi-security-XX.jar) should be in your
application's WEB-INF/lib. The realm name indicated
in your web.xml does matter with Jetty. The
web.xml must express the same
<realm-name> as your
jetty.xml (in the example above, "Spring Powered
Realm").
The following was tested with JBoss 3.2.6.
$JBOSS_HOME refers to the root of your JBoss
installation.
There are two different ways of making spring context available to the Jboss integration classes.
The first approach is by editing your
$JBOSS_HOME/server/your_config/conf/login-config.xml
file so that it contains a new entry under the
<Policy> section:
    <application-policy name = "SpringPoweredRealm">
       <authentication>
          <login-module code = "org.acegisecurity.adapters.jboss.JbossSpringLoginModule"
            flag = "required">
            <module-option name = "appContextLocation">acegisecurity.xml</module-option>
            <module-option name = "key">my_password</module-option>
         </login-module>
       </authentication>
    </application-policy>
Copy acegisecurity.xml into
$JBOSS_HOME/server/your_config/conf.
In this configuration acegisecurity.xml
contains the spring context definition including all the
authentication manager beans. You have to bear in mind though, that
SecurityContext is created and destroyed on each
login request, so the login operation might become costly.
Alternatively, the second approach is to use Spring singleton
capabilities through
org.springframework.beans.factory.access.SingletonBeanFactoryLocator.
The required configuration for this approach is:
    <application-policy name = "SpringPoweredRealm">
       <authentication>
          <login-module code = "org.acegisecurity.adapters.jboss.JbossSpringLoginModule"
            flag = "required">
            <module-option name = "singletonId">springRealm</module-option>
            <module-option name = "key">my_password</module-option>
            <module-option name = "authenticationManager">authenticationManager</module-option>
         </login-module>
       </authentication>
    </application-policy>
In the above code fragment,
authenticationManager is a helper property that
defines the expected name of the
AuthenticationManager in case you have several
defined in the IoC container. The singletonId
property references a bean defined in a
beanRefFactory.xml file. This file needs to be
available from anywhere on the JBoss classpath, including
$JBOSS_HOME/server/your_config/conf. The
beanRefFactory.xml contains the following
declaration:
<beans>
  <bean id="springRealm" singleton="true" lazy-init="true" class="org.springframework.context.support.ClassPathXmlApplicationContext">
    <constructor-arg>
      <list>
        <value>acegisecurity.xml</value>
      </list>
    </constructor-arg>
  </bean>
</beans>
Finally, irrespective of the configuration approach you need to
copy the following files into
$JBOSS_HOME/server/your_config/lib:
aopalliance.jarspring.jaracegi-security-jboss-XX.jarcommons-codec.jarburlap.jarhessian.jar
None of the above JAR files (or
acegi-security-XX.jar) should be in your
application's WEB-INF/lib. The realm name indicated
in your web.xml does not matter with JBoss.
However, your web application's
WEB-INF/jboss-web.xml must express the same
<security-domain> as your
login-config.xml. For example, to match the above
example, your jboss-web.xml would look like
this:
<jboss-web>
  <security-domain>java:/jaas/SpringPoweredRealm</security-domain>
</jboss-web>
The following was tested with Resin 3.0.6.
$RESIN_HOME refers to the root of your Resin
installation.
Resin provides several ways to support the container adapter. In the instructions below we have elected to maximise consistency with other container adapter configurations. This will allow Resin users to simply deploy the sample application and confirm correct configuration. Developers comfortable with Resin are naturally able to use its capabilities to package the JARs with the web application itself, and/or support single sign-on.
Copy the following files into
$RESIN_HOME/lib:
aopalliance.jarcommons-logging.jarspring.jaracegi-security-resin-XX.jarcommons-codec.jarburlap.jarhessian.jar
Unlike the container-wide acegisecurity.xml
files used by other container adapters, each Resin web application
will contain its own
WEB-INF/resin-acegisecurity.xml file. Each web
application will also contain a resin-web.xml file
which Resin uses to start the container adapter:
<web-app>
  <authenticator>
    <type>org.acegisecurity.adapters.resin.ResinAcegiAuthenticator</type>
    <init>
      <app-context-location>WEB-INF/resin-acegisecurity.xml</app-context-location>
      <key>my_password</key>
    </init>
  </authenticator>
</web-app>
With the basic configuration provided above, none of the JAR
files listed (or acegi-security-XX.jar) should be
in your application's WEB-INF/lib. The realm name
indicated in your web.xml does not matter with
Resin, as the relevant authentication class is indicated by the
<authenticator> setting.
Yale University produces an enterprise-wide single sign on system known as CAS. Unlike other initiatives, Yale's Central Authentication Service is open source, widely used, simple to understand, platform independent, and supports proxy capabilities. The Acegi Security System for Spring fully supports CAS, and provides an easy migration path from single-application deployments of Acegi Security through to multiple-application deployments secured by an enterprise-wide CAS server.
You can learn more about CAS at
http://www.yale.edu/tp/auth/. You will need to
visit this URL to download the CAS Server files. Whilst the Acegi
Security System for Spring includes two CAS libraries in the
"-with-dependencies" ZIP file, you will still need the CAS Java Server
Pages and web.xml to customise and deploy your CAS
server.
Whilst the CAS web site above contains two documents that detail the architecture of CAS, we present the general overview again here within the context of the Acegi Security System for Spring. The following refers to CAS 2.0, being the version of CAS that Acegi Security System for Spring supports.
Somewhere in your enterprise you will need to setup a CAS
server. The CAS server is simply a standard WAR file, so there isn't
anything difficult about setting up your server. Inside the WAR file
you will customise the login and other single sign on pages displayed
to users. You will also need to specify in the web.xml a
PasswordHandler. The
PasswordHandler has a simple method that returns a
boolean as to whether a given username and password is valid. Your
PasswordHandler implementation will need to link
into some type of backend authentication repository, such as an LDAP
server or database.
If you are already running an existing CAS server instance, you
will have already established a PasswordHandler. If
you do not already have a PasswordHandler, you
might prefer to use the Acegi Security System for Spring
CasPasswordHandler class. This class delegates
through to the standard Acegi Security
AuthenticationManager, enabling you to use a
security configuration you might already have in place. You do not
need to use the CasPasswordHandler class on your
CAS server if you do not wish. The Acegi Security System for Spring
will function as a CAS client successfully irrespective of the
PasswordHandler you've chosen for your CAS
server.
Apart from the CAS server itself, the other key player is of course the secure web applications deployed throughout your enterprise. These web applications are known as "services". There are two types of services: standard services and proxy services. A proxy service is able to request resources from other services on behalf of the user. This will be explained more fully later.
Services can be developed in a large variety of languages, due to CAS 2.0's very light XML-based protocol. The Yale CAS home page contains a clients archive which demonstrates CAS clients in Java, Active Server Pages, Perl, Python and others. Naturally, Java support is very strong given the CAS server is written in Java. You do not need to use any of CAS' client classes in applications secured by the Acegi Security System for Spring. This is handled transparently for you.
The basic interaction between a web browser, CAS server and an Acegi Security for System Spring secured service is as follows:
The web user is browsing the service's public pages. CAS or Acegi Security is not involved.
The user eventually requests a page that is either secure or one of the beans it uses is secure. Acegi Security's
SecurityEnforcementFilterwill detect theAuthenticationException.Because the user's
Authenticationobject (or lack thereof) caused anAuthenticationException, theSecurityEnforcementFilterwill call the configuredAuthenticationEntryPoint. If using CAS, this will be theCasProcessingFilterEntryPointclass.The
CasProcessingFilterEntrypoint will redirect the user's browser to the CAS server. It will also indicate aserviceparameter, which is the callback URL for the Acegi Security service. For example, the URL to which the browser is redirected might behttps://my.company.com/cas/login?service=https%3A%2F%2Fserver3.company.com%2Fwebapp%2Fj_acegi_cas_security_check.After the user's browser redirects to CAS, they will be prompted for their username and password. If the user presents a session cookie which indicates they've previously logged on, they will not be prompted to login again (there is an exception to this procedure, which we'll cover later). CAS will use the
PasswordHandlerdiscussed above to decide whether the username and password is valid.Upon successful login, CAS will redirect the user's browser back to the original service. It will also include a
ticketparameter, which is an opaque string representing the "service ticket". Continuing our earlier example, the URL the browser is redirected to might behttps://server3.company.com/webapp/j_acegi_cas_security_check?ticket=ST-0-ER94xMJmn6pha35CQRoZ.Back in the service web application, the
CasProcessingFilteris always listening for requests to/j_acegi_cas_security_check(this is configurable, but we'll use the defaults in this introduction). The processing filter will construct aUsernamePasswordAuthenticationTokenrepresenting the service ticket. The principal will be equal toCasProcessingFilter.CAS_STATEFUL_IDENTIFIER, whilst the credentials will be the service ticket opaque value. This authentication request will then be handed to the configuredAuthenticationManager.The
AuthenticationManagerimplementation will be theProviderManager, which is in turn configured with theCasAuthenticationProvider. TheCasAuthenticationProvideronly responds toUsernamePasswordAuthenticationTokens containing the CAS-specific principal (such asCasProcessingFilter.CAS_STATEFUL_IDENTIFIER) andCasAuthenticationTokens (discussed later).CasAuthenticationProviderwill validate the service ticket using aTicketValidatorimplementation. Acegi Security includes one implementation, theCasProxyTicketValidator. This implementation a ticket validation class included in the CAS client library. TheCasProxyTicketValidatormakes a HTTPS request to the CAS server in order to validate the service ticket. TheCasProxyTicketValidatormay also include a proxy callback URL, which is included in this example:https://my.company.com/cas/proxyValidate?service=https%3A%2F%2Fserver3.company.com%2Fwebapp%2Fj_acegi_cas_security_check&ticket=ST-0-ER94xMJmn6pha35CQRoZ&pgtUrl=https://server3.company.com/webapp/casProxy/receptor.Back on the CAS server, the proxy validation request will be received. If the presented service ticket matches the service URL the ticket was issued to, CAS will provide an affirmative response in XML indicating the username. If any proxy was involved in the authentication (discussed below), the list of proxies is also included in the XML response.
[OPTIONAL] If the request to the CAS validation service included the proxy callback URL (in the
pgtUrlparameter), CAS will include apgtIoustring in the XML response. ThispgtIourepresents a proxy-granting ticket IOU. The CAS server will then create its own HTTPS connection back to thepgtUrl. This is to mutually authenticate the CAS server and the claimed service URL. The HTTPS connection will be used to send a proxy granting ticket to the original web application. For example,https://server3.company.com/webapp/casProxy/receptor?pgtIou=PGTIOU-0-R0zlgrl4pdAQwBvJWO3vnNpevwqStbSGcq3vKB2SqSFFRnjPHt&pgtId=PGT-1-si9YkkHLrtACBo64rmsi3v2nf7cpCResXg5MpESZFArbaZiOKH. We suggest you use CAS'ProxyTicketReceptorservlet to receive these proxy-granting tickets, if they are required.The
CasProxyTicketValidatorwill parse the XML received from the CAS server. It will return to theCasAuthenticationProvideraTicketResponse, which includes the username (mandatory), proxy list (if any were involved), and proxy-granting ticket IOU (if the proxy callback was requested).Next
CasAuthenticationProviderwill call a configuredCasProxyDecider. TheCasProxyDeciderindicates whether the proxy list in theTicketResponseis acceptable to the service. Several implementations are provided with the Acegi Security System:RejectProxyTickets,AcceptAnyCasProxyandNamedCasProxyDecider. These names are largely self-explanatory, exceptNamedCasProxyDeciderwhich allows aListof trusted proxies to be provided.CasAuthenticationProviderwill next request aCasAuthoritiesPopulatorto advise theGrantedAuthorityobjects that apply to the user contained in theTicketResponse. Acegi Security includes aDaoCasAuthoritiesPopulatorwhich simply uses theUserDetailsServiceinfrastructure to find theUserDetailsand their associatedGrantedAuthoritys. Note that the password and enabled/disabled status ofUserDetailsreturned by theUserDetailsServiceare ignored, as the CAS server is responsible for authentication decisions.DaoCasAuthoritiesPopulatoris only concerned with retrieving theGrantedAuthoritys.If there were no problems,
CasAuthenticationProviderconstructs aCasAuthenticationTokenincluding the details contained in theTicketResponseand theGrantedAuthoritys. TheCasAuthenticationTokencontains the hash of a key, so that theCasAuthenticationProviderknows it created it.Control then returns to
CasProcessingFilter, which places the createdCasAuthenticationTokeninto theHttpSessionattribute namedHttpSessionIntegrationFilter.ACEGI_SECURITY_AUTHENTICATION_KEY.The user's browser is redirected to the original page that caused the
AuthenticationException.As the
Authenticationobject is now in the well-known location, it is handled like any other authentication approach. Usually theHttpSessionIntegrationFilterwill be used to associate theAuthenticationobject with theSecurityContextHolderfor the duration of each request.
It's good that you're still here! It might sound involved, but you can relax as the Acegi Security System for Spring classes hide much of the complexity. Let's now look at how this is configured.
As mentioned above, the Acegi Security System for Spring
includes a PasswordHandler that bridges your
existing AuthenticationManager into CAS. You do not
need to use this PasswordHandler to use Acegi
Security on the client side (any CAS
PasswordHandler will do).
To install, you will need to download and extract the CAS server
archive. We used version 2.0.12. There will be a
/web directory in the root of the deployment. Copy
an applicationContext.xml containing your
AuthenticationManager as well as the
CasPasswordHandler into the
/web/WEB-INF directory. A sample
applicationContext.xml is included below:
<bean id="inMemoryDaoImpl" class="org.acegisecurity.userdetails.memory.InMemoryDaoImpl">
  <property name="userMap">
    <value>
      marissa=koala,ROLES_IGNORED_BY_CAS
      dianne=emu,ROLES_IGNORED_BY_CAS
      scott=wombat,ROLES_IGNORED_BY_CAS
      peter=opal,disabled,ROLES_IGNORED_BY_CAS
    </value>
  </property>
</bean>

<bean id="daoAuthenticationProvider" class="org.acegisecurity.providers.dao.DaoAuthenticationProvider">
  <property name="userDetailsService"><ref bean="inMemoryDaoImpl"/></property>
</bean>

<bean id="authenticationManager" class="org.acegisecurity.providers.ProviderManager">
  <property name="providers">
    <list>
      <ref bean="daoAuthenticationProvider"/>
    </list>
  </property>
</bean>

<bean id="casPasswordHandler" class="org.acegisecurity.adapters.cas.CasPasswordHandler">
  <property name="authenticationManager"><ref bean="authenticationManager"/></property>
</bean>
Note the granted authorities are ignored by CAS because it has no way of communicating the granted authorities to calling applications. CAS is only concerned with username and passwords (and the enabled/disabled status).
Next you will need to edit the existing
/web/WEB-INF/web.xml file. Add (or edit in the case
of the authHandler property) the following
lines:
<context-param>
  <param-name>edu.yale.its.tp.cas.authHandler</param-name>
  <param-value>org.acegisecurity.adapters.cas.CasPasswordHandlerProxy</param-value>
</context-param>

<context-param>
  <param-name>contextConfigLocation</param-name>
  <param-value>/WEB-INF/applicationContext.xml</param-value>
</context-param>

<listener>
  <listener-class>org.springframework.web.context.ContextLoaderListener</listener-class>
</listener>
Copy the spring.jar and
acegi-security.jar files into
/web/WEB-INF/lib. Now use the ant
dist task in the build.xml in the root of
the directory structure. This will create
/lib/cas.war, which is ready for deployment to your
servlet container.
Note CAS heavily relies on HTTPS. You can't even test the system
without a HTTPS certificate. Whilst you should refer to your web
container's documentation on setting up HTTPS, if you need some
additional help or a test certificate you might like to check the
samples/contacts/etc/ssl directory.
The web application side of CAS is made easy due to the Acegi Security System for Spring. It is assumed you already know the basics of using the Acegi Security System for Spring, so these are not covered again below. Only the CAS-specific beans are mentioned.
You will need to add a ServiceProperties bean
to your application context. This represents your service:
<bean id="serviceProperties" class="org.acegisecurity.ui.cas.ServiceProperties">
  <property name="service"><value>https://localhost:8443/contacts-cas/j_acegi_cas_security_check</value></property>
  <property name="sendRenew"><value>false</value></property>
</bean>
The service must equal a URL that will be
monitored by the CasProcessingFilter. The
sendRenew defaults to false, but should be set to
true if your application is particularly sensitive. What this
parameter does is tell the CAS login service that a single sign on
login is unacceptable. Instead, the user will need to re-enter their
username and password in order to gain access to the service.
The following beans should be configured to commence the CAS authentication process:
<bean id="casProcessingFilter" class="org.acegisecurity.ui.cas.CasProcessingFilter">
  <property name="authenticationManager"><ref bean="authenticationManager"/></property>
  <property name="authenticationFailureUrl"><value>/casfailed.jsp</value></property>
  <property name="defaultTargetUrl"><value>/</value></property>
  <property name="filterProcessesUrl"><value>/j_acegi_cas_security_check</value></property>
</bean>

<bean id="securityEnforcementFilter" class="org.acegisecurity.intercept.web.SecurityEnforcementFilter">
  <property name="filterSecurityInterceptor"><ref bean="filterInvocationInterceptor"/></property>
  <property name="authenticationEntryPoint"><ref bean="casProcessingFilterEntryPoint"/></property>
</bean>

<bean id="casProcessingFilterEntryPoint" class="org.acegisecurity.ui.cas.CasProcessingFilterEntryPoint">
  <property name="loginUrl"><value>https://localhost:8443/cas/login</value></property>
  <property name="serviceProperties"><ref bean="serviceProperties"/></property>
</bean>
You will also need to add the
CasProcessingFilter to web.xml:
<filter>
  <filter-name>Acegi CAS Processing Filter</filter-name>
  <filter-class>org.acegisecurity.util.FilterToBeanProxy</filter-class>
  <init-param>
    <param-name>targetClass</param-name>
    <param-value>org.acegisecurity.ui.cas.CasProcessingFilter</param-value>
  </init-param>
</filter>

<filter-mapping>
  <filter-name>Acegi CAS Processing Filter</filter-name>
  <url-pattern>/*</url-pattern>
</filter-mapping>
The CasProcessingFilter has very similar
properties to the AuthenticationProcessingFilter
(used for form-based logins). Each property is
self-explanatory.
For CAS to operate, the
SecurityEnforcementFilter must have its
authenticationEntryPoint property set to the
CasProcessingFilterEntryPoint bean.
The CasProcessingFilterEntryPoint must refer
to the ServiceProperties bean (discussed above),
which provides the URL to the enterprise's CAS login server. This is
where the user's browser will be redirected.
Next you need to add an AuthenticationManager
that uses CasAuthenticationProvider and its
collaborators:
<bean id="authenticationManager" class="org.acegisecurity.providers.ProviderManager">
  <property name="providers">
    <list>
      <ref bean="casAuthenticationProvider"/>
    </list>
  </property>
</bean>

<bean id="casAuthenticationProvider" class="org.acegisecurity.providers.cas.CasAuthenticationProvider">
  <property name="casAuthoritiesPopulator"><ref bean="casAuthoritiesPopulator"/></property>
  <property name="casProxyDecider"><ref bean="casProxyDecider"/></property>
  <property name="ticketValidator"><ref bean="casProxyTicketValidator"/></property>
  <property name="statelessTicketCache"><ref bean="statelessTicketCache"/></property>
  <property name="key"><value>my_password_for_this_auth_provider_only</value></property>
</bean>

<bean id="casProxyTicketValidator" class="org.acegisecurity.providers.cas.ticketvalidator.CasProxyTicketValidator">
  <property name="casValidate"><value>https://localhost:8443/cas/proxyValidate</value></property>
  <property name="proxyCallbackUrl"><value>https://localhost:8443/contacts-cas/casProxy/receptor</value></property>
  <property name="serviceProperties"><ref bean="serviceProperties"/></property>
  <!-- <property name="trustStore"><value>/some/path/to/your/lib/security/cacerts</value></property> -->
</bean>

<bean id="cacheManager" class="org.springframework.cache.ehcache.EhCacheManagerFactoryBean">
  <property name="configLocation">
    <value>classpath:/ehcache-failsafe.xml</value>
  </property>
</bean>

<bean id="ticketCacheBackend" class="org.springframework.cache.ehcache.EhCacheFactoryBean">
  <property name="cacheManager">
    <ref local="cacheManager"/>
  </property>
  <property name="cacheName">
    <value>ticketCache</value>
  </property>
</bean>

<bean id="statelessTicketCache" class="org.acegisecurity.providers.cas.cache.EhCacheBasedTicketCache">
  <property name="cache"><ref local="ticketCacheBackend"/></property>
</bean>

<bean id="casAuthoritiesPopulator" class="org.acegisecurity.providers.cas.populator.DaoCasAuthoritiesPopulator">
  <property name="userDetailsService"><ref bean="inMemoryDaoImpl"/></property>
</bean>

<bean id="casProxyDecider" class="org.acegisecurity.providers.cas.proxy.RejectProxyTickets"/>
The beans are all reasonable self-explanatory if you refer back
to the "How CAS Works" section. Careful readers might notice one
surprise: the statelessTicketCache property of the
CasAuthenticationProvider. This is discussed in
detail in the "Advanced CAS Usage" section.
Note the CasProxyTicketValidator has a
remarked out trustStore property. This property
might be helpful if you experience HTTPS certificate issues. Also note
the proxyCallbackUrl is set so the service can
receive a proxy-granting ticket. As mentioned above, this is optional
and unnecessary if you do not require proxy-granting tickets. If you
do use this feature, you will need to configure a suitable servlet to
receive the proxy-granting tickets. We suggest you use CAS'
ProxyTicketReceptor by adding the following to your
web application's web.xml:
<servlet>
  <servlet-name>casproxy</servlet-name>
  <servlet-class>edu.yale.its.tp.cas.proxy.ProxyTicketReceptor</servlet-class>
</servlet>

<servlet-mapping>
  <servlet-name>casproxy</servlet-name>
  <url-pattern>/casProxy/*</url-pattern>
</servlet-mapping>
This completes the configuration of CAS. If you haven't made any mistakes, your web application should happily work within the framework of CAS single sign on. No other parts of the Acegi Security System for Spring need to be concerned about the fact CAS handled authentication.
There is also a contacts-cas.war file in the
sample applications directory. This sample application uses the above
settings and can be deployed to see CAS in operation.
The CasAuthenticationProvider distinguishes
between stateful and stateless clients. A stateful client is
considered any that originates via the
CasProcessingFilter. A stateless client is any that
presents an authentication request via the
UsernamePasswordAuthenticationToken with a
principal equal to
CasProcessingFilter.CAS_STATELESS_IDENTIFIER.
Stateless clients are likely to be via remoting protocols such
as Hessian and Burlap. The BasicProcessingFilter is
still used in this case, but the remoting protocol client is expected
to present a username equal to the static string above, and a password
equal to a CAS service ticket. Clients should acquire a CAS service
ticket directly from the CAS server.
Because remoting protocols have no way of presenting themselves
within the context of a HttpSession, it isn't
possible to rely on the HttpSession's
HttpSessionIntegrationFilter.ACEGI_SECURITY_AUTHENTICATION_KEY
attribute to locate the CasAuthenticationToken.
Furthermore, because the CAS server invalidates a service ticket after
it has been validated by the TicketValidator,
presenting the same service ticket on subsequent requests will not
work. It is similarly very difficult to obtain a proxy-granting ticket
for a remoting protocol client, as they are often deployed on client
machines which rarely have HTTPS URLs that would be accessible to the
CAS server.
One obvious option is to not use CAS at all for remoting protocol clients. However, this would eliminate many of the desirable features of CAS.
As a middle-ground, the
CasAuthenticationProvider uses a
StatelessTicketCache. This is used solely for
requests with a principal equal to
CasProcessingFilter.CAS_STATELESS_IDENTIFIER. What
happens is the CasAuthenticationProvider will store
the resulting CasAuthenticationToken in the
StatelessTicketCache, keyed on the service ticket.
Accordingly, remoting protocol clients can present the same service
ticket and the CasAuthenticationProvider will not
need to contact the CAS server for validation (aside from the first
request).
The other aspect of advanced CAS usage involves creating proxy
tickets from the proxy-granting ticket. As indicated above, we
recommend you use CAS' ProxyTicketReceptor to
receive these tickets. The ProxyTicketReceptor
provides a static method that enables you to obtain a proxy ticket by
presenting the proxy-granting IOU ticket. You can obtain the
proxy-granting IOU ticket by calling
CasAuthenticationToken.getProxyGrantingTicketIou().
It is hoped you find CAS integration easy and useful with the Acegi Security System for Spring classes. Welcome to enterprise-wide single sign on!
The most common use of X509 certificate authentication is in verifying the identity of a server when using SSL, most commonly when using HTTPS from a browser. The browser will automatically check that the certificate presented by a server has been issued (ie digitally signed) by one of a list of trusted certificate authorities which it maintains.
You can also use SSL with “mutual authentication”; the server will then request a valid certificate from the client as part of the SSL handshake. The server will authenticate the client by checking that it's certificate is signed by an acceptable authority. If a valid certificate has been provided, it can be obtained through the servlet API in an application. The Acegi Security X509 module extracts the certificate using a filter and passes it to the configured X509 authentication provider to allow any additional application-specific checks to be applied. It also maps the certificate to an application user and loads that user's set of granted authorities for use with the standard Acegi Security infrastructure.
You should be familiar with using certificates and setting up client authentication for your servlet container before attempting to use it with Acegi Security. Most of the work is in creating and installing suitable certificates and keys. For example, if you're using Tomcat then read the instructions here http://jakarta.apache.org/tomcat/tomcat-5.0-doc/ssl-howto.html. It's important that you get this working before trying it out with Acegi Security.
With X509 authentication, there is no explicit login procedure so the implementation is relatively simple; there is no need to redirect requests in order to interact with the user. As a result, some of the classes behave slightly differently from their equivalents in other packages. For example, the default “entry point” class, which is normally responsible for starting the authentication process, is only invoked if the certificate is rejected and it always returns an error to the user. With a suitable bean configuration, the normal sequence of events is as follows
The
X509ProcessingFilterextracts the certificate from the request and uses it as the credentials for an authentication request. The generated authentication request is anX509AuthenticationToken. The request is passed to the authentication manager.The
X509AuthenticationProviderreceives the token. Its main concern is to obtain the user information (in particular the user's granted authorities) that matches the certificate. It delegates this responsibility to anX509AuthoritiesPopulator.The populator's single method,
getUserDetails(X509Certificate
              userCertificate)
is invoked. Implementations should return aUserDetailsinstance containing the array ofGrantedAuthorityobjects for the user. This method can also choose to reject the certificate (for example if it doesn't contain a matching user name). In such cases it should throw aBadCredentialsException. A DAO-based implementation,DaoX509AuthoritiesPopulator, is provided which extracts the user's name from the subject “common name” (CN) in the certificate. It also allows you to set your own regular expression to match a different part of the subject's distinguished name. A UserDetailsService is used to load the user information.If everything has gone smoothly then there should be a valid
Authenticationobject in the secure context and the invocation will procede as normal. If no certificate was found, or the certificate was rejected, then theSecurityEnforcementFilterwill invoke theX509ProcessingFilterEntryPointwhich returns a 403 error (forbidden) to the user.
There is a version of the Contacts Sample Application which uses X509. Copy the beans and filter setup from this as a starting point for configuring your own application. A set of example certificates is also included which you can use to configure your server. These are
marissa.p12: A PKCS12 format file containing the client key and certificate. These should be installed in your browser. It maps to the user “marissa” in the application.server.p12: The server certificate and key for HTTPS connections.ca.jks: A Java keystore containing the certificate for the authority which issued marissa's certificate. This will be used by the container to validate client certificates.
server.xml file looks like
this <!-- SSL/TLS Connector configuration -->
<Connector port="8443" address="${jboss.bind.address}"
maxThreads="100" minSpareThreads="5" maxSpareThreads="15"
scheme="https" secure="true"
sslProtocol = "TLS"
clientAuth="true" keystoreFile="${jboss.server.home.dir}/conf/server.p12"
keystoreType="PKCS12" keystorePass="password"
truststoreFile="${jboss.server.home.dir}/conf/ca.jks"
truststoreType="JKS" truststorePass="password"
/>clientAuth can also be set to
want if you still want SSL connections to
succeed even if the client doesn't provide a certificate. Obviously
these clients won't be able to access any objects secured by Acegi
Security (unless you use a non-X509 authentication mechanism, such as
BASIC authentication, to authenticate the user).In addition to coordinating the authentication and authorization
requirements of your application, the Acegi Security System for Spring
is also able to ensure unauthenticated web requests have certain
properties. These properties may include being of a particular
transport type, having a particular HttpSession
attribute set and so on. The most common requirement is for your web
requests to be received using a particular transport protocol, such as
HTTPS.
An important issue in considering transport security is that of
session hijacking. Your web container manages a
HttpSession by reference to a
jsessionid that is sent to user agents either via a
cookie or URL rewriting. If the jsessionid is ever
sent over HTTP, there is a possibility that session identifier can be
intercepted and used to impersonate the user after they complete the
authentication process. This is because most web containers maintain
the same session identifier for a given user, even after they switch
from HTTP to HTTPS pages.
If session hijacking is considered too significant a risk for
your particular application, the only option is to use HTTPS for every
request. This means the jsessionid is never sent
across an insecure channel. You will need to ensure your
web.xml-defined
<welcome-file> points to a HTTPS location,
and the application never directs the user to a HTTP location. The
Acegi Security System for Spring provides a solution to assist with
the latter.
To utilise Acegi Security's channel security services, add the
following lines to web.xml:
<filter>
  <filter-name>Acegi Channel Processing Filter</filter-name>
  <filter-class>org.acegisecurity.util.FilterToBeanProxy</filter-class>
  <init-param>
    <param-name>targetClass</param-name>
    <param-value>org.acegisecurity.securechannel.ChannelProcessingFilter</param-value>
  </init-param>
</filter>

<filter-mapping>
  <filter-name>Acegi Channel Processing Filter</filter-name>
  <url-pattern>/*</url-pattern>
</filter-mapping>
As usual when running FilterToBeanProxy, you
will also need to configure the filter in your application
context:
<bean id="channelProcessingFilter" class="org.acegisecurity.securechannel.ChannelProcessingFilter">
  <property name="channelDecisionManager"><ref bean="channelDecisionManager"/></property>
  <property name="filterInvocationDefinitionSource">
    <value>
      CONVERT_URL_TO_LOWERCASE_BEFORE_COMPARISON
      \A/secure/.*\Z=REQUIRES_SECURE_CHANNEL
      \A/acegilogin.jsp.*\Z=REQUIRES_SECURE_CHANNEL
      \A/j_acegi_security_check.*\Z=REQUIRES_SECURE_CHANNEL
      \A.*\Z=REQUIRES_INSECURE_CHANNEL
    </value>
  </property>
</bean>

<bean id="channelDecisionManager" class="org.acegisecurity.securechannel.ChannelDecisionManagerImpl">
  <property name="channelProcessors">
    <list>
      <ref bean="secureChannelProcessor"/>
      <ref bean="insecureChannelProcessor"/>
    </list>
  </property>
</bean>

<bean id="secureChannelProcessor" class="org.acegisecurity.securechannel.SecureChannelProcessor"/>
<bean id="insecureChannelProcessor" class="org.acegisecurity.securechannel.InsecureChannelProcessor"/>
Like FilterSecurityInterceptor, Apache Ant
style paths are also supported by the
ChannelProcessingFilter.
The ChannelProcessingFilter operates by
filtering all web requests and determining the configuration
attributes that apply. It then delegates to the
ChannelDecisionManager. The default implementation,
ChannelDecisionManagerImpl, should suffice in most
cases. It simply delegates through the list of configured
ChannelProcessor instances. A
ChannelProcessor will review the request, and if it
is unhappy with the request (eg it was received across the incorrect
transport protocol), it will perform a redirect, throw an exception or
take whatever other action is appropriate.
Included with the Acegi Security System for Spring are two
concrete ChannelProcessor implementations:
SecureChannelProcessor ensures requests with a
configuration attribute of REQUIRES_SECURE_CHANNEL
are received over HTTPS, whilst
InsecureChannelProcessor ensures requests with a
configuration attribute of
REQUIRES_INSECURE_CHANNEL are received over HTTP.
Both implementations delegate to a
ChannelEntryPoint if the required transport
protocol is not used. The two ChannelEntryPoint
implementations included with Acegi Security simply redirect the
request to HTTP and HTTPS as appropriate. Appropriate defaults are
assigned to the ChannelProcessor implementations
for the configuration attribute keywords they respond to and the
ChannelEntryPoint they delegate to, although you
have the ability to override these using the application
context.
Note that the redirections are absolute (eg
http://www.company.com:8080/app/page), not relative
(eg /app/page). During testing it was discovered
that Internet Explorer 6 Service Pack 1 has a bug whereby it does not
respond correctly to a redirection instruction which also changes the
port to use. Accordingly, absolute URLs are used in conjunction with
bug detection logic in the PortResolverImpl that is
wired up by default to many Acegi Security beans. Please refer to the
JavaDocs for PortResolverImpl for further
details.
Once configured, using the channel security filter is very easy.
Simply request pages without regard to the protocol (ie HTTP or HTTPS)
or port (eg 80, 8080, 443, 8443 etc). Obviously you'll still need a
way of making the initial request (probably via the
web.xml <welcome-file> or
a well-known home page URL), but once this is done the filter will
perform redirects as defined by your application context.
You can also add your own ChannelProcessor
implementations to the ChannelDecisionManagerImpl.
For example, you might set a HttpSession attribute
when a human user is detected via a "enter the contents of this
graphic" procedure. Your ChannelProcessor would
respond to say REQUIRES_HUMAN_USER configuration
attributes and redirect to an appropriate entry point to start the
human user validation process if the HttpSession
attribute is not currently set.
To decide whether a security check belongs in a
ChannelProcessor or an
AccessDecisionVoter, remember that the former is
designed to handle unauthenticated requests, whilst the latter is
designed to handle authenticated requests. The latter therefore has
access to the granted authorities of the authenticated principal. In
addition, problems detected by a ChannelProcessor
will generally cause a HTTP/HTTPS redirection so its requirements can
be met, whilst problems detected by an
AccessDecisionVoter will ultimately result in an
AccessDeniedException (depending on the governing
AccessDecisionManager).
Complex applications often will find the need to define access
permissions not simply at a web request or method invocation level.
Instead, security decisions need to comprise both who
(Authentication), where
(MethodInvocation) and what
(SomeDomainObject). In other words, authorization
decisions also need to consider the actual domain object instance
subject of a method invocation.
Imagine you're designing an application for a pet clinic. There will be two main groups of users of your Spring-based application: staff of the pet clinic, as well as the pet clinic's customers. The staff will have access to all of the data, whilst your customers will only be able to see their own customer records. To make it a little more interesting, your customers can allow other users to see their customer records, such as their "puppy preschool "mentor or president of their local "Pony Club". Using Acegi Security System for Spring as the foundation, you have several approaches that can be used:
Write your business methods to enforce the security. You could consult a collection within the
Customerdomain object instance to determine which users have access. By using theSecurityContextHolder.getContext().getAuthentication(), you'll be able to access theAuthenticationobject.Write an
AccessDecisionVoterto enforce the security from theGrantedAuthority[]s stored in theAuthenticationobject. This would mean yourAuthenticationManagerwould need to populate theAuthenticationwith customGrantedAuthority[]s representing each of theCustomerdomain object instances the principal has access to.Write an
AccessDecisionVoterto enforce the security and open the targetCustomerdomain object directly. This would mean your voter needs access to a DAO that allows it to retrieve theCustomerobject. It would then access theCustomerobject's collection of approved users and make the appropriate decision.
Each one of these approaches is perfectly legitimate. However,
the first couples your authorization checking to your business code.
The main problems with this include the enhanced difficulty of unit
testing and the fact it would be more difficult to reuse the
Customer authorization logic elsewhere. Obtaining
the GrantedAuthority[]s from the
Authentication object is also fine, but will not
scale to large numbers of Customers. If a user
might be able to access 5,000 Customers (unlikely
in this case, but imagine if it were a popular vet for a large Pony
Club!) the amount of memory consumed and time required to construct
the Authentication object would be undesirable. The
final method, opening the Customer directly from
external code, is probably the best of the three. It achieves
separation of concerns, and doesn't misuse memory or CPU cycles, but
it is still inefficient in that both the
AccessDecisionVoter and the eventual business
method itself will perform a call to the DAO responsible for
retrieving the Customer object. Two accesses per
method invocation is clearly undesirable. In addition, with every
approach listed you'll need to write your own access control list
(ACL) persistence and business logic from scratch.
Fortunately, there is another alternative, which we'll talk about below.
The org.acegisecurity.acl package is very
simple, comprising only a handful of interfaces and a single class, as
shown in Figure 6. It provides the basic foundation for access control
list (ACL) lookups.

Figure 6: Access Control List Manager
The central interface is AclManager, which is
defined by two methods:
public AclEntry[] getAcls(java.lang.Object domainInstance);
public AclEntry[] getAcls(java.lang.Object domainInstance, Authentication authentication);
AclManager is intended to be used as a
collaborator against your business objects, or, more desirably,
AccessDecisionVoters. This means you use Spring's
normal ApplicationContext features to wire up your
AccessDecisionVoter (or business method) with an
AclManager. Consideration was given to placing the
ACL information in the ContextHolder, but it was
felt this would be inefficient both in terms of memory usage as well
as the time spent loading potentially unused ACL information. The
trade-off of needing to wire up a collaborator for those objects
requiring ACL information is rather minor, particularly in a
Spring-managed application.
The first method of the AclManager will
return all ACLs applying to the domain object instance passed to it.
The second method does the same, but only returns those ACLs which
apply to the passed Authentication object.
The AclEntry interface returned by
AclManager is merely a marker interface. You will
need to provide an implementation that reflects that ACL permissions
for your application.
Rounding out the org.acegisecurity.acl
package is an AclProviderManager class, with a
corresponding AclProvider interface.
AclProviderManager is a concrete implementation of
AclManager, which iterates through registered
AclProviders. The first
AclProvider that indicates it can authoritatively
provide ACL information for the presented domain object instance will
be used. This is very similar to the
AuthenticationProvider interface used for
authentication.
With this background, let's now look at a usable ACL implementation.
Acegi Security System for Spring includes a production-quality ACL provider implementation, which is shown in Figure 7.

Figure 7: Basic ACL Manager
The implementation is based on integer masking, which is
commonly used for ACL permissions given its flexibility and speed.
Anyone who has used Unix's chmod command will know
all about this type of permission masking (eg chmod
777). You'll find the classes and interfaces for the integer
masking ACL package under
org.acegisecurity.acl.basic.
Extending the AclEntry interface is a
BasicAclEntry interface, with the main methods
shown below:
public AclObjectIdentity getAclObjectIdentity();
public AclObjectIdentity getAclObjectParentIdentity();
public int getMask();
public java.lang.Object getRecipient();
As shown, each BasicAclEntry has four main
properties. The mask is the integer that represents
the permissions granted to the recipient. The
aclObjectIdentity is able to identify the domain
object instance for which the ACL applies, and the
aclObjectParentIdentity optionally specifies the
parent of the domain object instance. Multiple
BasicAclEntrys usually exist against a single
domain object instance, and as suggested by the parent identity
property, permissions granted higher in the object hierarchy will
trickle down and be inherited (unless blocked by integer zero).
BasicAclEntry implementations typically
provide convenience methods, such as
isReadAllowed(), to avoid application classes
needing to perform bit masking themselves. The
SimpleAclEntry and
AbstractBasicAclEntry demonstrate and provide much
of this bit masking logic.
The AclObjectIdentity itself is merely a
marker interface, so you need to provide implementations for your
domain objects. However, the package does include a
NamedEntityObjectIdentity implementation which will
suit many needs. The NamedEntityObjectIdentity
identifies a given domain object instance by the classname of the
instance and the identity of the instance. A
NamedEntityObjectIdentity can be constructed
manually (by calling the constructor and providing the classname and
identity Strings), or by passing in any domain
object that contains a getId() method.
The actual AclProvider implementation is
named BasicAclProvider. It has adopted a similar
design to that used by the authentication-related
DaoAuthenticationProvder. Specifically, you define
a BasicAclDao against the provider, so different
ACL repository types can be accessed in a pluggable manner. The
BasicAclProvider also supports pluggable cache
providers (with Acegi Security System for Spring including an
implementation that fronts EH-CACHE).
The BasicAclDao interface is very simple to
implement:
public BasicAclEntry[] getAcls(AclObjectIdentity aclObjectIdentity);
A BasicAclDao implementation needs to
understand the presented AclObjectIdentity and how
it maps to a storage repository, find the relevant records, and create
appropriate BasicAclEntry objects and return
them.
Acegi Security includes a single BasicAclDao
implementation called JdbcDaoImpl. As implied by
the name, JdbcDaoImpl accesses ACL information from
a JDBC database. There is also an extended version of this DAO,
JdbcExtendedDaoImpl, which provides CRUD operations
on the JDBC database, although we won't discuss these features here.
The default database schema and some sample data will aid in
understanding its function:
CREATE TABLE acl_object_identity (
     id IDENTITY NOT NULL,
     object_identity VARCHAR_IGNORECASE(250) NOT NULL,
     parent_object INTEGER,
     acl_class VARCHAR_IGNORECASE(250) NOT NULL,
     CONSTRAINT unique_object_identity UNIQUE(object_identity),
     FOREIGN KEY (parent_object) REFERENCES acl_object_identity(id)
);

CREATE TABLE acl_permission (
     id IDENTITY NOT NULL,
     acl_object_identity INTEGER NOT NULL,
     recipient VARCHAR_IGNORECASE(100) NOT NULL,
     mask INTEGER NOT NULL,
     CONSTRAINT unique_recipient UNIQUE(acl_object_identity, recipient),
     FOREIGN KEY (acl_object_identity) REFERENCES acl_object_identity(id)
);

INSERT INTO acl_object_identity VALUES (1, 'corp.DomainObject:1', null, 'org.acegisecurity.acl.basic.SimpleAclEntry');
INSERT INTO acl_object_identity VALUES (2, 'corp.DomainObject:2', 1, 'org.acegisecurity.acl.basic.SimpleAclEntry');
INSERT INTO acl_object_identity VALUES (3, 'corp.DomainObject:3', 1, 'org.acegisecurity.acl.basic.SimpleAclEntry');
INSERT INTO acl_object_identity VALUES (4, 'corp.DomainObject:4', 1, 'org.acegisecurity.acl.basic.SimpleAclEntry');
INSERT INTO acl_object_identity VALUES (5, 'corp.DomainObject:5', 3, 'org.acegisecurity.acl.basic.SimpleAclEntry');
INSERT INTO acl_object_identity VALUES (6, 'corp.DomainObject:6', 3, 'org.acegisecurity.acl.basic.SimpleAclEntry');

INSERT INTO acl_permission VALUES (null, 1, 'ROLE_SUPERVISOR', 1);
INSERT INTO acl_permission VALUES (null, 2, 'ROLE_SUPERVISOR', 0);
INSERT INTO acl_permission VALUES (null, 2, 'marissa', 2);
INSERT INTO acl_permission VALUES (null, 3, 'scott', 14);
INSERT INTO acl_permission VALUES (null, 6, 'scott', 1);
As can be seen, database-specific constraints are used extensively to ensure the integrity of the ACL information. If you need to use a different database (Hypersonic SQL statements are shown above), you should try to implement equivalent constraints.
The JdbcDaoImpl will only respond to requests
for NamedEntityObjectIdentitys. It converts such
identities into a single String, comprising
the NamedEntityObjectIdentity.getClassname() +
":" +
NamedEntityObjectIdentity.getId(). This yields the
type of object_identity values shown above. As
indicated by the sample data, each database row corresponds to a
single BasicAclEntry. As stated earlier and
demonstrated by corp.DomainObject:2 in the above
sample data, each domain object instance will often have multiple
BasicAclEntry[]s.
As JdbcDaoImpl is required to return concrete
BasicAclEntry classes, it needs to know which
BasicAclEntry implementation it is to create and
populate. This is the role of the acl_class column.
JdbcDaoImpl will create the indicated class and set
its mask, recipient,
aclObjectIdentity and
aclObjectParentIdentity properties.
As you can probably tell from the sample data, the
parent_object_identity value can either be null or
in the same format as the object_identity. If
non-null, JdbcDaoImpl will create a
NamedEntityObjectIdentity to place inside the
returned BasicAclEntry class.
Returning to the BasicAclProvider, before it
can poll the BasicAclDao implementation it needs to
convert the domain object instance it was passed into an
AclObjectIdentity.
BasicAclProvider has a protected
AclObjectIdentity obtainIdentity(Object domainInstance)
method that is responsible for this. As a protected method, it enables
subclasses to easily override. The normal implementation checks
whether the passed domain object instance implements the
AclObjectIdentityAware interface, which is merely a
getter for an AclObjectIdentity. If the domain
object does implement this interface, that is the identity returned.
If the domain object does not implement this interface, the method
will attempt to create an AclObjectIdentity by
passing the domain object instance to the constructor of a class
defined by the
BasicAclProvider.getDefaultAclObjectIdentity()
method. By default the defined class is
NamedEntityObjectIdentity, which was described in
more detail above. Therefore, you will need to either (i) provide a
getId() method on your domain objects, (ii)
implement AclObjectIdentityAware on your domain
objects, (iii) provide an alternative
AclObjectIdentity implementation that will accept
your domain object in its constructor, or (iv) override the
obtainIdentity(Object) method.
Once the AclObjectIdentity of the domain
object instance is determined, the BasicAclProvider
will poll the DAO to obtain its BasicAclEntry[]s.
If any of the entries returned by the DAO indicate there is a parent,
that parent will be polled, and the process will repeat until there is
no further parent. The permissions assigned to a
recipient closest to the domain object instance
will always take priority and override any inherited permissions. From
the sample data above, the following inherited permissions would
apply:
--- Mask integer 0  = no permissions
--- Mask integer 1  = administer
--- Mask integer 2  = read
--- Mask integer 6  = read and write permissions
--- Mask integer 14 = read and write and create permissions

---------------------------------------------------------------------
--- *** INHERITED RIGHTS FOR DIFFERENT INSTANCES AND RECIPIENTS ***
--- INSTANCE  RECIPIENT         PERMISSION(S) (COMMENT #INSTANCE)
---------------------------------------------------------------------
---    1      ROLE_SUPERVISOR   Administer
---    2      ROLE_SUPERVISOR   None (overrides parent #1)
---           marissa           Read
---    3      ROLE_SUPERVISOR   Administer (from parent #1)
---           scott             Read, Write, Create
---    4      ROLE_SUPERVISOR   Administer (from parent #1)
---    5      ROLE_SUPERVISOR   Administer (from parent #3)
---           scott             Read, Write, Create (from parent #3)
---    6      ROLE_SUPERVISOR   Administer (from parent #3)
---           scott             Administer (overrides parent #3)
So the above explains how a domain object instance has its
AclObjectIdentity discovered, and the
BasicAclDao will be polled successively until an
array of inherited permissions is constructed for the domain object
instance. The final step is to determine the
BasicAclEntry[]s that are actually applicable to a
given Authentication object.
As you would recall, the AclManager (and all
delegates, up to and including BasicAclProvider)
provides a method which returns only those
BasicAclEntry[]s applying to a passed
Authentication object.
BasicAclProvider delivers this functionality by
delegating the filtering operation to an
EffectiveAclsResolver implementation. The default
implementation,
GrantedAuthorityEffectiveAclsResolver, will iterate
through the BasicAclEntry[]s and include only those
where the recipient is equal to either the
Authentication's principal or
any of the Authentication's
GrantedAuthority[]s. Please refer to the JavaDocs
for more information.
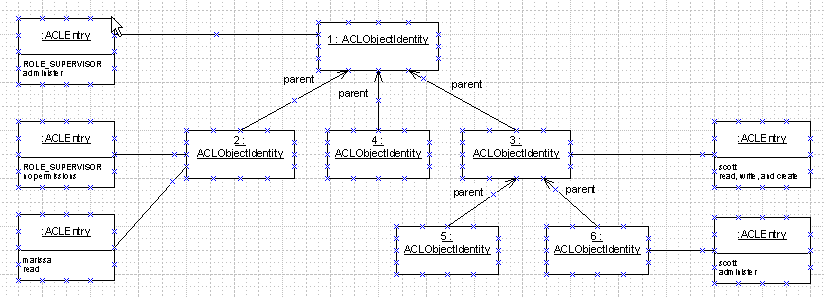
Figure 8: ACL Instantiation Approach
Acegi Security's instance-specific ACL packages shield you from much of the complexity of developing your own ACL approach. The interfaces and classes detailed above provide a scalable, customisable ACL solution that is decoupled from your application code. Whilst the reference documentation may suggest complexity, the basic implementation is able to support most typical applications out-of-the-box.
The Acegi Security System for Spring uses filters extensively. Each filter is covered in detail in a respective section of this document. This section includes information that applies to all filters.
Most filters are configured using the
FilterToBeanProxy. An example configuration from
web.xml follows:
<filter>
  <filter-name>Acegi HTTP Request Security Filter</filter-name>
  <filter-class>org.acegisecurity.util.FilterToBeanProxy</filter-class>
  <init-param>
    <param-name>targetClass</param-name>
    <param-value>org.acegisecurity.ClassThatImplementsFilter</param-value>
  </init-param>
</filter>
Notice that the filter in web.xml is actually
a FilterToBeanProxy, and not the filter that will
actually implements the logic of the filter. What
FilterToBeanProxy does is delegate the
Filter's methods through to a bean which is
obtained from the Spring application context. This enables the bean to
benefit from the Spring application context lifecycle support and
configuration flexibility. The bean must implement
javax.servlet.Filter.
The FilterToBeanProxy only requires a single
initialization parameter, targetClass or
targetBean. The targetClass
parameter locates the first object in the application context of the
specified class, whilst targetBean locates the
object by bean name. Like standard Spring web applications, the
FilterToBeanProxy accesses the application context
via
WebApplicationContextUtils.getWebApplicationContext(ServletContext),
so you should configure a ContextLoaderListener in
web.xml.
There is a lifecycle issue to consider when hosting
Filters in an IoC container instead of a servlet
container. Specifically, which container should be responsible for
calling the Filter's "startup" and "shutdown"
methods? It is noted that the order of initialization and destruction
of a Filter can vary by servlet container, and this
can cause problems if one Filter depends on
configuration settings established by an earlier initialized
Filter. The Spring IoC container on the other hand
has more comprehensive lifecycle/IoC interfaces (such as
InitializingBean,
DisposableBean, BeanNameAware,
ApplicationContextAware and many others) as well as
a well-understood interface contract, predictable method invocation
ordering, autowiring support, and even options to avoid implementing
Spring interfaces (eg the destroy-method attribute
in Spring XML). For this reason we recommend the use of Spring
lifecycle services instead of servlet container lifecycle services
wherever possible. By default FilterToBeanProxy
will not delegate init(FilterConfig) and
destroy() methods through to the proxied bean. If
you do require such invocations to be delegated, set the
lifecycle initialization parameter to
servlet-container-managed.
We strongly recommend to use FilterChainProxy
instead of adding multiple filters to
web.xml.
Whilst FilterToBeanProxy is a very useful
class, the problem is that the lines of code required for
<filter> and
<filter-mapping> entries in
web.xml explodes when using more than a few
filters. To overcome this issue, Acegi Security provides a
FilterChainProxy class. It is wired using a
FilterToBeanProxy (just like in the example above),
but the target class is
org.acegisecurity.util.FilterChainProxy. The filter
chain is then declared in the application context, using code such as
this:
<bean id="filterChainProxy" class="org.acegisecurity.util.FilterChainProxy">
  <property name="filterInvocationDefinitionSource">
    <value>
      CONVERT_URL_TO_LOWERCASE_BEFORE_COMPARISON
      PATTERN_TYPE_APACHE_ANT
      /webServices/**=httpSessionContextIntegrationFilterWithASCFalse,basicProcessingFilter,securityEnforcementFilter
      /**=httpSessionContextIntegrationFilterWithASCTrue,authenticationProcessingFilter,securityEnforcementFilter
    </value>
  </property>
</bean>
You may notice similarities with the way
SecurityEnforcementFilter is declared. Both regular
expressions and Ant Paths are supported, and the most specific URIs
appear first. At runtime the FilterChainProxy will
locate the first URI pattern that matches the current web request.
Each of the corresponding configuration attributes represent the name
of a bean defined in the application context. The filters will then be
invoked in the order they are specified, with standard
FilterChain behaviour being respected (a
Filter can elect not to proceed with the chain if
it wishes to end processing).
As you can see, FitlerChainProxy requires the
duplication of filter names for different request patterns (in the
above example, httpSessionContextIntegrationFilter
and securityEnforcementFilter are duplicated). This
design decision was made to enable FilterChainProxy
to specify different Filter invocation orders for
different URI patterns, and also to improve both the expressiveness
(in terms of regular expressions, Ant Paths, and any custom
FilterInvocationDefinitionSource implementations)
and clarity of which Filters should be
invoked.
You may have noticed we have declared two
HttpSessionContextIntegrationFilters in the filter
chain (ASC is short for
allowSessionCreation, a property of
HttpSessionContextIntegrationFilter). As web
services will never present a jsessionid on future
requests, creating HttpSessions for such user
agents would be wasteful. If you had a high-volume application which
required maximum scalability, we recommend you use the approach shown
above. For smaller applications, using a single
HttpSessionContextIntegrationFilter (with its
default allowSessionCreation as
true) would likely be sufficient.
In relation to lifecycle issues, the
FilterChainProxy will always delegate
init(FilterConfig) and destroy()
methods through to the underlaying Filters if such
methods are called against FilterChainProxy itself.
In this case, FilterChainProxy guarantees to only
initialize and destroy each Filter once,
irrespective of how many times it is declared by the
FilterInvocationDefinitionSource. You control the
overall choice as to whether these methods are called or not via the
lifecycle initialization parameter of the
FilterToBeanProxy that proxies
FilterChainProxy. As discussed above, by default
any servlet container lifecycle invocations are not delegated through
to FilterChainProxy.
The order that filters are defined in web.xml
is important. NB: THE FILTER ORDER CHANGED FROM VERSION 0.8.0.
Irrespective of which filters you are actually using, the order
of the <filter-mapping>s should be as
follows:
ChannelProcessingFilter, because it might need to redirect to a different protocolConcurrentSessionFilter, because it doesn't use anySecurityContextHolderfunctionality but needs to update theSessionRegistryto reflect ongoing requests from the principalHttpSessionContextIntegrationFilter, so aContextcan be setup in theSecurityContextHolderat the beginning of a web request, and any changes to the Context can be copied to theHttpSessionwhen the web request ends (ready for use with the next web request)Authentication processing mechanisms -
AuthenticationProcessingFilter,CasProcessingFilter,BasicProcessingFilter, HttpRequestIntegrationFilter, JbossIntegrationFilteretc - so that theSecurityContextHoldercan be modified to contain a validAuthenticationrequest tokenThe
ContextHolderAwareRequestFilter, if you are using it to install an Acegi Security awareHttpServletRequestWrapperinto your servlet containerRememberMeProcessingFilter, so that if no earlier authentication processing mechanism updated theSecurityContextHolder, and the request presents a cookie that enables remember-me services to take place, a suitable rememberedAuthenticationAnonymousProcessingFilter, so that if no earlier authentication processing mechanism updated theSecurityContextHolder, an anonymousAuthenticationobject will be put thereSecurityEnforcementFilter, to protect web URIs and catch any Acegi Security exceptions so that an appropriateAuthenticationEntryPointcan be launched
All of the above filters use
FilterToBeanProxy or
FilterChainProxy, which is discussed in the
previous sections. It is recommended that a single
FilterToBeanProxy proxy through to a single
FilterChainProxy for each application, with that
FilterChainProxy defining all of the Acegi Security
Filters.
If you're using SiteMesh, ensure the Acegi Security filters
execute before the SiteMesh filters are called. This enables the
SecurityContextHolder to be populated in time for
use by SiteMesh decorators.
Included with the Acegi Security System for Spring is a very simple application that can demonstrate the basic security facilities provided by the system (and confirm your Container Adapter is properly configured if you're using one).
If you build from CVS, the Contacts sample application includes
three deployable versions:
acegi-security-sample-contacts-filter.war is
configured with the HTTP Session Authentication approach. The
acegi-security-sample-contacts-ca.waracegi-security-sample-contacts-cas.war is designed to
work with a Yale CAS server. If you're just wanting to see how the
sample application works, please use
acegi-security-sample-contacts-filter.war
To deploy, simply copy the relevant WAR file from the Acegi
Security System for Spring distribution into your container’s
webapps directory.
After starting your container, check the application can load.
Visit
http://localhost:8080/acegi-security-sample-contacts-filter
Next, click "Debug". You will be prompted to authenticate, and a series of usernames and passwords are suggested on that page. Simply authenticate with any of these and view the resulting page. It should contain a success message similar to the following:
Context on SecurityContextHolder is of type: org.acegisecurity.context.SecurityContextImpl
The Context implements SecurityContext.
Authentication object is of type: org.acegisecurity.adapters.PrincipalAcegiUserToken
Authentication object as a String: org.acegisecurity.adapters.PrincipalAcegiUserToken@e9a7c2: Username: marissa; Password: [PROTECTED]; Authenticated: true; Granted Authorities: ROLE_TELLER, ROLE_SUPERVISOR
Authentication object holds the following granted authorities:
ROLE_TELLER (getAuthority(): ROLE_TELLER)
ROLE_SUPERVISOR (getAuthority(): ROLE_SUPERVISOR)
SUCCESS! Your [container adapter|web filter] appears to be properly configured!
If you receive a different message, and deployed
acegi-security-sample-contacts-ca.war, check you have
properly configured your Container Adapter as described elsewhere in
this reference guide.
Once you successfully receive the above message, return to the
sample application's home page and click "Manage". You can then try out
the application. Notice that only the contacts available to the
currently logged on user are displayed, and only users with
ROLE_SUPERVISOR are granted access to delete their
contacts. Behind the scenes, the
MethodSecurityInterceptor is securing the business
objects. If you're using
acegi-security-sample-contacts-filter.waracegi-security-sample-contacts-cas.war, the
FilterSecurityInterceptor is also securing the HTTP
requests. If using either of these WARs, be sure to try visiting
http://localhost:8080/contacts/secure/super, which
will demonstrate access being denied by the
SecurityEnforcementFilter. Note the sample
application enables you to modify the access control lists associated
with different contacts. Be sure to give this a try and understand how
it works by reviewing the sample application's application context XML
files.
The Contacts sample application also include a
client directory. Inside you will find a small
application that queries the backend business objects using several web
services protocols. This demonstrates how to use the Acegi Security
System for Spring for authentication with Spring remoting protocols. To
try this client, ensure your servlet container is still running the
Contacts sample application, and then execute client marissa
koala. The command-line parameters respectively represent the
username to use, and the password to use. Note that you may need to edit
client.properties to use a different target
URL.
Please note the sample application's client
does not currently support CAS. You can still give it a try, though, if
you're ambitious: try client _cas_stateless_
YOUR-SERVICE-TICKET-ID.
We welcome you to become involved in the Acegi Security System for Spring project. There are many ways of contributing, including reading the mailing list and responding to questions from other people, writing new code, improving existing code, assisting with documentation, or simply making suggestions. Please read our project policies web page that is available on the Acegi Security home page. This explains the path to become a committer, and the administration approaches we use with the project.
SourceForge provides CVS services for the project, allowing anybody to access the latest code. If you wish to contribute new code, please observe the following requirements. These exist to maintain the quality and consistency of the project:
Use a suitable IDE Jalopy plug-in to convert your code into the project's consistent style
Ensure your code does not break any unit tests (run the Maven
test:testgoal)If you have added new code, please provide suitable unit tests (use the Maven
clover:html-reportto view coverage)Join the acegisecurity-developer and acegisecurity-cvs mailing lists so you're in the loop
Use CamelCase
Add code contributions to JIRA
Add a CVS
$Id: index.xml,v 1.3 2004/04/02 21:12:25
          fbos Exp $
tag to the JavaDocs for any new class you create
Questions and comments on the Acegi Security System for Spring are
welcome. Please use the Spring Community Forum web site at
http://forum.springframework.org. You're also welcome
to join the acegisecurity-developer mailing list. Our project home page
(where you can obtain the latest release of the project and access to
CVS, mailing lists, forums etc) is at
http://acegisecurity.sourceforge.net.